How do I set up DMARC, SPF, and DKIM on DreamHost?
 ChatGPT
 Claude
 Gemini
 Perplexity
 Grok
GrokIn brief
How to set up DMARC, SPF, and DKIM on DreamHost: add the required DNS records, validate the live sending path, and review DMARC reports safely.

Set up DMARC, SPF, and DKIM on DreamHost by opening the domain's DNS settings, publishing the DMARC policy at _dmarc.yourdomain.com, and confirming the SPF and DKIM records used by each real sending service. DNS publication is only the first check. Confirm DreamHost's status where available, inspect a delivered production message, then review DMARC aggregate reports before requesting stricter DMARC handling.
At a glance
Quick takeaways
- DMARC evaluates whether SPF or DKIM passes with alignment to the visible From domain.
- A DMARC policy belongs at
_dmarc.yourdomain.com, not at the root hostname. - Publish one SPF TXT record for a domain's authorized sending services.
- Use the actual DKIM selector and key values generated by the sending service.
- A DNS lookup confirms a public record, but it does not prove a production application is using it.
- Validate DNS, the vendor's status, delivered-message headers, and DMARC reports separately.
How DreamHost DNS fits into DMARC, SPF, and DKIM
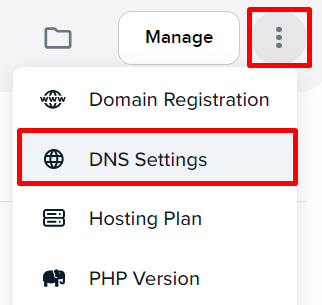
DreamHost provides a DNS Settings entry for domain management in its website-management interface. Its instructions for adding custom DNS records are the current provider reference for opening that area and adding a record.
DMARC, SPF, and DKIM each use DNS, but they answer different questions:
- SPF publishes which sending infrastructure is authorized to use the envelope sender domain.
- DKIM publishes a public key for a selector so receiving systems can verify a message signature.
- DMARC checks whether SPF or DKIM passes with the visible From domain aligned, then applies the domain owner's published handling request when DMARC fails.
For broader protocol context, the email authentication learning hub collects related guidance. If Amazon SES, Brevo, or Customer.io sends any mail for the domain, use that provider's own setup values rather than treating DreamHost DNS as the source of the sending configuration. Palisade also has provider-specific guidance for Amazon SES, Brevo, and Customer.io.
When the setup changes
The DNS location is consistent, but the required values change with the mail path.
Use this decision rule:
- If DreamHost hosts DNS for the domain, publish the values generated by each sender in DreamHost DNS Settings.
- If another provider is authoritative for DNS, publish the same provider-generated values at that authoritative DNS provider instead.
- If more than one service sends with the domain, consolidate their SPF authorization into one SPF record and publish each service's separate DKIM records.
- If a service sends with a different visible From domain or a different envelope sender domain, validate the exact production message. A record at the root domain does not prove alignment for every subdomain or return path.
- If you do not know which service sent a message, inspect its raw headers before editing DNS.
Do not replace an existing SPF value with a single new provider include unless you have confirmed every authorized sender that must remain in the record. Removing an existing authorization can cause legitimate mail to fail SPF.
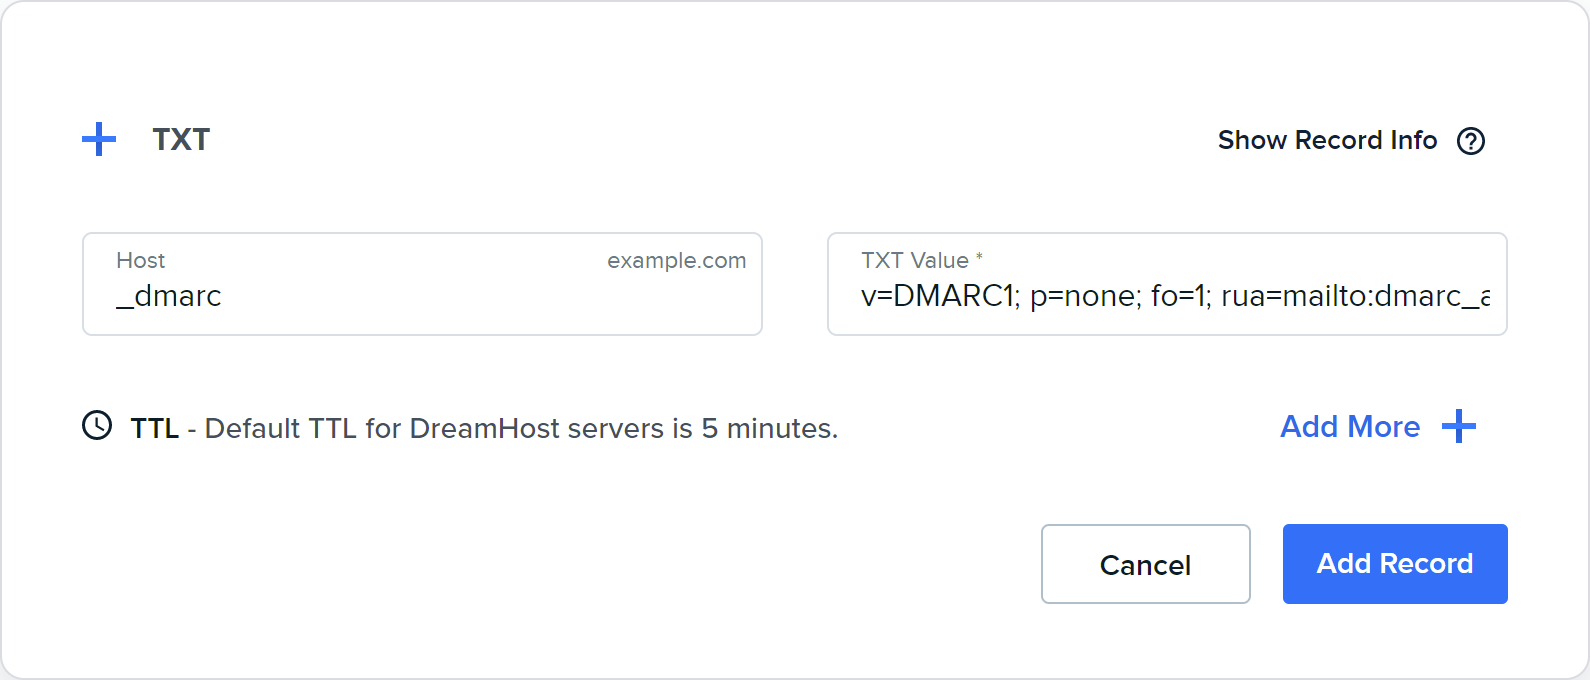
DreamHost's DMARC policy documentation shows the provider's DNS record editor for a DMARC TXT entry. Follow the current provider documentation for the form fields and save process, then compare the published result with the record your team approved.
Worked DNS record example
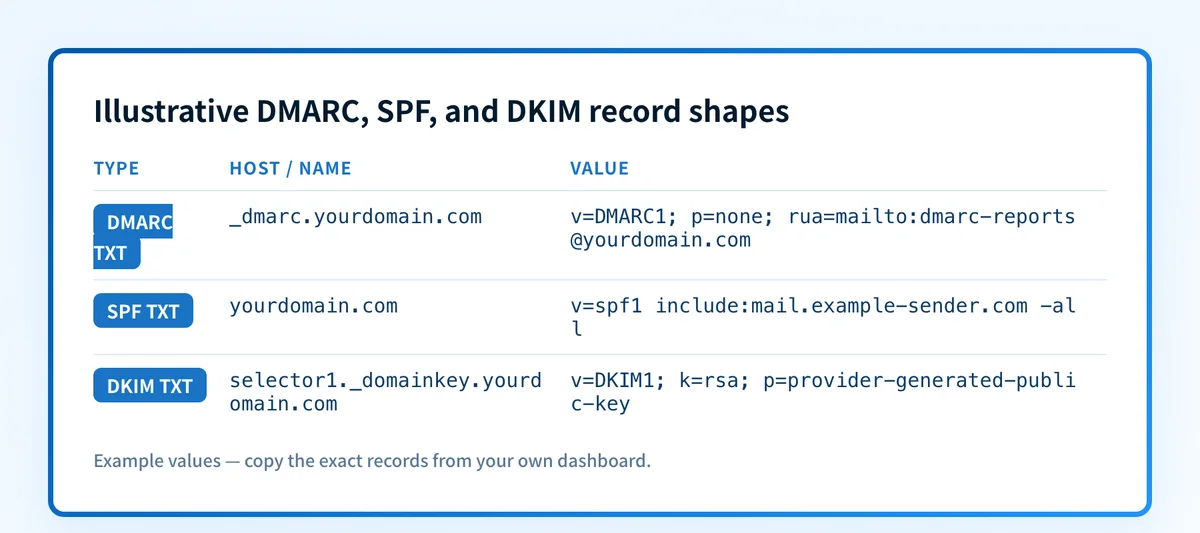
Use the following as a structural example only. Do not publish these values as-is. Replace the SPF mechanisms and DKIM selector value with those generated for your own sending services, and use a reporting address your organization controls.
DMARC host: _dmarc.yourdomain.com
DMARC value: v=DMARC1; p=none; rua=mailto:dmarc-reports@yourdomain.com
SPF host: yourdomain.com
SPF value: v=spf1 include:mail.example-sender.com -all
DKIM host: selector1._domainkey.yourdomain.com
DKIM value: v=DKIM1; k=rsa; p=provider-generated-public-key
The DMARC example begins with p=none, which requests monitoring rather than stronger handling for DMARC failures. That is appropriate only while the domain owner is collecting evidence about legitimate senders. The record does not make mail pass DMARC by itself.
The SPF example is deliberately incomplete. It has one example sender because each domain needs its own reviewed set of authorizations. DKIM is also provider-specific: the selector and public key come from the service that signs the message. Never paste a public key, CNAME target, or verification token copied from another tenant.
Validate the published configuration
Start with the evidence you have.
If you have only a domain name, use the DMARC checker to inspect the publicly visible DMARC record. Confirm the hostname, policy tags, and reporting destination against the approved record. A public DNS check does not prove that a website, mailbox, or marketing platform is sending with the configuration.
If you can access DreamHost or another sender's account, check that service's current domain-authentication status after DNS has updated. A green provider status is useful, but it still does not prove a message delivered through the exact production path.
If you have a delivered test message, inspect its raw headers. Look for the receiver's Authentication-Results field and confirm whether SPF and DKIM passed, then compare the authenticated domains with the visible From domain. Test each important path separately, including mailbox mail, contact forms, transactional mail, and campaign mail.
Finally, wait for DMARC aggregate reports to accumulate and review which sources are using the domain and which paths still fail alignment. This is the evidence needed before considering a move from p=none to a stricter DMARC policy.
Check the DreamHost domain's published DMARC record
After saving the DreamHost DNS entry, inspect the domain's public DMARC record and compare it with the value you intended to publish.
Check the published DMARC record
A public record check cannot repair DNS, confirm a sender is signing messages, show every production sending source, or guarantee how a receiver will place future mail. Palisade is agentic DMARC software that analyzes DMARC aggregate-report data, identifies authentication and alignment issues, and proposes the next policy step for human review. It does not autonomously change your DMARC policy or guarantee delivery.
Evidence
Sources and further reading
Questions readers ask
Frequently asked questions
Do I add DMARC, SPF, and DKIM in the same DreamHost screen?
Yes. When DreamHost is authoritative for the domain's DNS, the DNS Settings area is where you publish the required record types. The exact hostnames and values differ by protocol and by the service that sends the message.
Can I use more than one SPF record?
No. Publish one SPF record for the domain, then incorporate the authorized mechanisms required by the sending services you have verified. Review the complete value before replacing an existing SPF record.
Does a DMARC record make DreamHost mail authenticate?
No. A DMARC record publishes a policy and reporting request. It does not configure a mail application to use an authorized envelope sender or add a DKIM signature to outgoing mail.
Should I set p=reject when I first publish DMARC?
No. First identify legitimate sending sources and validate SPF or DKIM alignment on their real delivered messages. Review DMARC aggregate reports before requesting stronger handling for mail that fails DMARC.
How do I confirm DKIM is working?
Only a delivered message from the exact sending path can confirm that path is signing and that a receiver evaluated the signature. Check the raw message headers, then compare the DKIM selector and domain with the DNS record published for that sender.
Does a DMARC checker prove inbox placement?
No. A DMARC checker can inspect the public policy record. It cannot prove a receiver's private filtering decision, the state of every sender, or future inbox placement.

Written by
Samuel ChenardCEO & Co-Founder, Palisade
Samuel Chenard is the CEO and co-founder of Palisade, agentic DMARC software for IT teams and MSPs, from one domain to thousands.
More from Samuel →