HostGator DMARC setup
 ChatGPT
 Claude
 Gemini
 Perplexity
 Grok
In brief
HostGator DMARC setup: publish a DMARC TXT record, start with monitoring, validate DNS and delivered mail, then progress toward enforcement.

HostGator DMARC setup means publishing a DMARC DNS TXT record in the authoritative DNS zone for your domain, after SPF and DKIM are configured for the mail you send. Start with p=none so you can collect reports and find legitimate sources before moving to quarantine or reject. DMARC tells receiving servers how to handle mail that fails SPF or DKIM authentication. This guide does not walk through HostGator's own DNS screens, because Palisade has not verified them; it covers the record itself and how to check it. See the DMARC learning hub if you need the protocol background first.
At a glance
Quick takeaways
- Publish one DMARC TXT record for the organizational domain, normally at
_dmarc.yourdomain.com. - Confirm which provider hosts authoritative DNS before making a HostGator account change.
- Enable SPF and/or DKIM before DMARC, then allow time for those records to settle.
- Start with
p=noneand review aggregate reports before applying quarantine or reject. - Validate DNS, sender configuration, a newly delivered message, and DMARC reports separately.
- A public DNS lookup does not prove that every production sender authenticates or aligns.
Scope and prerequisites
This guide does not cover HostGator's own DNS or cPanel screens, so use HostGator's help for the exact menu path in your account. The procedure applies when HostGator manages the authoritative DNS zone for the domain. If your domain uses nameservers from another provider, add the DMARC record with that DNS provider instead. The registrar, web host, mailbox provider, and authoritative DNS host can be different services.
Before editing DNS, identify the visible From domain used by each sending path: employee mail, website forms, transactional mail, CRM messages, and marketing platforms. Record the responsible application owner, DNS change owner, report mailbox owner, and a rollback contact.
Google's DMARC setup guidance says SPF and/or DKIM must be enabled before DMARC and states: "Allow 48 hours after setting up SPF and/or DKIM before setting up DMARC." Each third-party sender needs its own SPF and DKIM configuration before you enforce DMARC.
For DKIM, use the record values generated by the sender that signs the mail. Do not reuse a selector, public key, or CNAME target from another account. The Cloudflare DKIM setup guide explains why sender-generated DKIM values must remain specific to the sending service.
Set a rollback condition before publishing: if the proposed record would replace an existing DMARC TXT record, stop and preserve the existing value. A domain should not have competing DMARC policy records. If a later enforcement change affects legitimate mail, return to the last reviewed policy while you investigate the affected source.
Choose the implementation approach
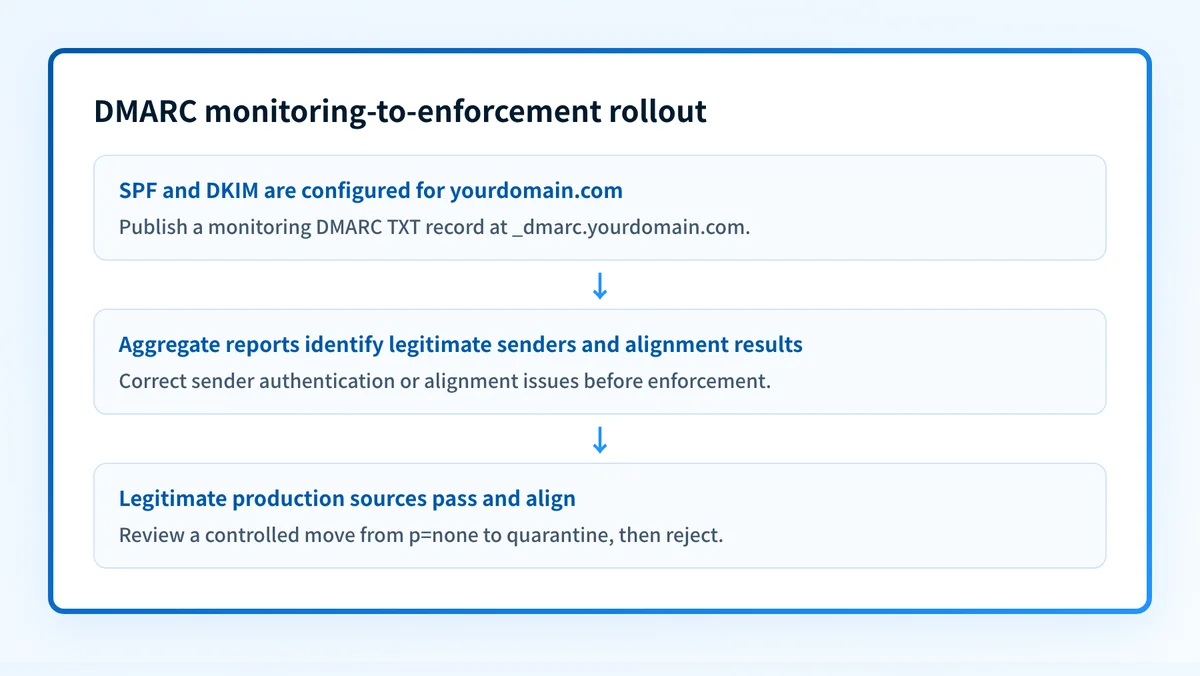
Use a monitoring-first rollout unless report evidence already accounts for every legitimate source.
- Use
p=nonewhen you need visibility into authentication and alignment results without asking receivers to quarantine or reject unauthenticated mail. - Use
p=quarantineonly after reports show that legitimate production sources authenticate and align as intended. - Use
p=rejectonly after the same evidence supports full enforcement. - Use
pctwhen you need to apply quarantine or reject to a percentage of unauthenticated messages. Google documents thatpctmust be a whole number from 1 through 100 and defaults to 100 when omitted.
p=none, reviewing results, and progressing later to quarantine or reject. If you use BIMI, Google's guidance requires p=quarantine or p=reject with pct=100. Monitoring-only DMARC does not meet that BIMI requirement.
HostGator's article on Google's email sender requirements covers adding a DMARC TXT record, choosing a policy, and rolling it out gradually. It shows no HostGator DNS screens, and it does not replace checking the authoritative DNS zone or inspecting mail from each production path.
How to configure DMARC in HostGator DNS
1. Confirm where the domain's authoritative DNS is hosted
Check the domain's active nameservers and identify the service that answers authoritative DNS queries. Use the DNS management interface for that service.
Do not assume that a domain registered or hosted at HostGator has HostGator-managed DNS. If another service hosts the DNS zone, publishing a record in HostGator will not change the public record receivers query.
2. Create a dedicated aggregate-report destination
Choose a mailbox, group, or reporting service that can receive DMARC aggregate reports. Google recommends including the optional rua tag and using a dedicated destination because report volume can be high.
The report address must start with mailto:. Make sure the responsible team can access it and knows which domain the reports represent. Do not use a personal inbox that could be abandoned during a staffing change.
3. Add the monitoring record without replacing existing DNS records
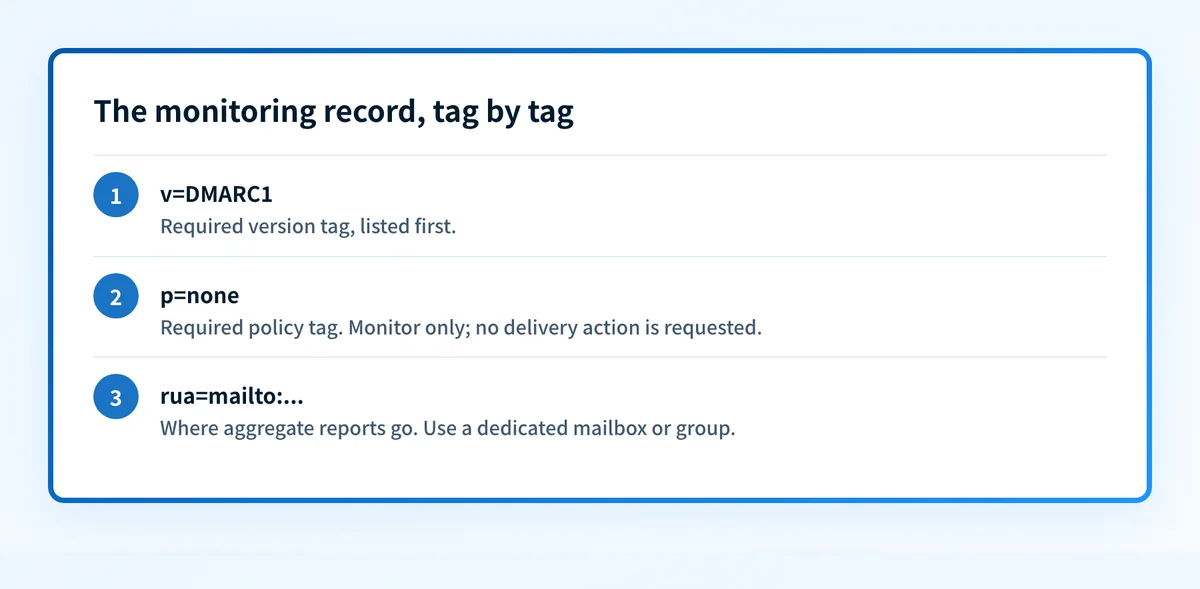
Create a DNS TXT record for the DMARC host. The following is an illustrative starting shape only. Replace yourdomain.com and the report mailbox with values your organization controls.
Host/name: _dmarc
Type: TXT
Value: v=DMARC1; p=none; rua=mailto:dmarc-reports@yourdomain.com
Do not delete or overwrite an existing DMARC TXT record to add this example. If one already exists, review its policy and reporting tags before making a controlled update.
Google states that v and p are required, that the version value is DMARC1, and that the v and p tags must come first. A DMARC record is published through the domain host, not through Google Admin console.
4. Save the record and query the full DMARC name
After the DNS interface confirms the change, query the full record name. The expected owner is _dmarc.yourdomain.com, even when the DNS interface asks only for _dmarc because it appends the zone automatically.
dig +short TXT _dmarc.yourdomain.comCompare the returned record with the intended value. Query an authoritative nameserver when possible, then compare it with a public resolver. A resolver result can be delayed by caching, while the authoritative answer shows what the zone currently publishes.
5. Keep the policy at monitoring while reports accumulate
Review the aggregate reports for each known production sender. Look for sources that fail SPF or DKIM, plus sources that pass authentication but do not align with the visible From domain.
Do not move to quarantine or reject because a DNS lookup shows a valid record. A published record proves only the public DNS state. It does not prove that a CRM, website form, relay, or marketing platform is authenticated correctly.
For a broader implementation sequence, see How to set up DMARC.
How to validate the setup
Validate HostGator DMARC setup at four layers. Each layer answers a different question.
- DNS: Query
_dmarc.yourdomain.comat the authoritative nameserver and a public resolver. Confirm the intendedv=DMARC1andp=nonerecord appears. - Sender: Check the current status in every sending service. Confirm SPF and DKIM are enabled for the exact domain and sending path in use.
- Message: Send a new message through each production path and inspect the receiver-added authentication results. A historical message cannot prove the current DNS or sender state.
- DMARC reporting: Review aggregate reports after data accumulates. Confirm legitimate sources pass and align before changing from monitoring to enforcement.
The checker can inspect public DNS. It cannot prove that a particular application sends through the expected path, that every source is represented in reports, or that a receiver will accept or place a future message in the inbox.
If you manage many domains or recurring sender changes, Palisade is agentic DMARC software that analyzes DMARC aggregate-report data, identifies sending sources and authentication or alignment issues, and creates prioritized remediation tickets. It can propose the next policy stage based on evidence, while your team reviews the evidence and applies the DNS change.
Palisade does not autonomously change your DMARC policy, repair every sender, or guarantee delivery or inbox placement.
Troubleshooting
The DMARC lookup returns no record
First confirm that you published the record in the authoritative DNS zone. Then check the full owner name. A DNS interface that appends the zone can create an incorrect name if you enter the domain twice.
Compare the authoritative response with the public resolver response before treating the issue as propagation. Also confirm that the record type is TXT and that the host is _dmarc, not the root domain.
The record appears in DNS but reports show unknown senders
Unknown sources in DMARC aggregate reports need investigation before enforcement. Identify the source IP address, the visible From domain, the application owner, and whether the source is expected to send for the domain.
Do not add an SPF include, DKIM record, or DMARC exception based on an IP address alone. Confirm the sender with the application owner and its current authentication instructions first.
A sender passes SPF or DKIM but fails DMARC
DMARC requires an aligned SPF or DKIM pass. Compare the visible From domain with the SPF envelope domain and the DKIM d= domain in the delivered message's authentication results.
A valid signature from an unrelated domain can pass DKIM while still failing DMARC alignment. Fix the specific sender configuration rather than weakening the DMARC policy.
cPanel is available but the DNS record is not visible publicly
cPanel's Zone Editor edits the DNS zone records that exist on the server you are logged in to, per cPanel's documentation. Receivers only see those records if the domain's active nameservers point to that server. Check the active nameservers and the authoritative DNS response before editing the record again.
Evidence
Sources and further reading
Questions readers ask
Frequently asked questions
How to setup DMARC correctly?
Enable SPF and/or DKIM first, allow time for those records to settle, create an aggregate-report destination, and publish a DMARC TXT record through the authoritative DNS host. Start with p=none, review report evidence for every legitimate sender, then progress to quarantine or reject when the evidence supports enforcement.
What should my DMARC be set to?
Start your DMARC policy with p=none while you identify legitimate sending sources and their authentication results. Google recommends monitoring first, then moving to quarantine or reject after review. The right report address and alignment settings depend on your domain and senders.
How to set up DMARC on cPanel?
Only use cPanel to set up DMARC when cPanel manages the authoritative DNS zone for the domain. Add a TXT record at the DMARC host with a monitoring value such as v=DMARC1; p=none; rua=mailto:dmarc-reports@yourdomain.com, then confirm the public DNS response. Palisade has not verified the HostGator-specific cPanel path, so confirm it in your account, and confirm first that the domain's nameservers point to the server whose zone you edit.
How to add DKIM record in HostGator?
Get the DKIM selector and record value from the sending service that signs your mail, then publish exactly the TXT or CNAME record that service generates in the authoritative DNS zone. Do not invent a selector, key, or target. Validate the result with a new delivered message that shows the expected DKIM pass.
Does a published DMARC record mean DMARC is working?
No. A published DMARC record proves that public DNS returns a record. It does not prove that every production sender has aligned SPF or DKIM, that aggregate reports include all expected sources, or that a receiver will place every message in the inbox.

Written by
Samuel ChenardCEO & Co-Founder, Palisade
Samuel Chenard is the CEO and co-founder of Palisade, agentic DMARC software for IT teams and MSPs, from one domain to thousands.
More from Samuel →