DKIM fail body hash did not verify Office 365
 ChatGPT
 Claude
 Gemini
 Perplexity
 Grok
In brief
DKIM fail body hash did not verify in Office 365 means the signed message body did not validate. Check the selector, signing path, and message headers.
A DKIM failure reported as "body hash did not verify" on mail sent through Microsoft 365 means the verifier could not match the signed body hash to the body it received. That exact wording is not from Microsoft's documentation, so check the result text in the Authentication-Results header of the failing message first.
Then confirm that Microsoft 365 is signing the custom From domain, that the selector DNS record resolves, and that the delivered message did not change after signing. Microsoft documents the DKIM configuration process in the Defender portal, but its generated CNAME values are specific to your tenant and domain.
This page is the Office 365-specific diagnosis. For the protocol-level causes of a body-hash failure on any mail system, read DKIM fail: body hash did not verify.
At a glance
Quick takeaways
- A DKIM body-hash failure is a message-verification result, not proof that DNS alone is wrong.
- Microsoft 365 does not DKIM-sign outbound mail from custom domains until DKIM is configured for those domains.
- Use the
d=signing domain ands=selector inDKIM-Signatureto identify the DNS record involved. - Microsoft 365 generates two selector key pairs for each configured custom domain or subdomain, with one selector active at a time.
- A DKIM pass supports DMARC only when the DKIM signing domain aligns with the visible From domain.
- A public DNS lookup cannot prove what happened to a particular message after it was signed.
What should I check before configuring Microsoft 365?
Confirm that the affected message was sent through Microsoft 365 and that the visible From domain is a custom domain you control. A message sent by another marketing, support, or transactional platform needs that platform's DKIM configuration and message path investigated separately. The DKIM learning hub explains the protocol context, while this guide focuses on Microsoft 365 custom-domain signing and a body-hash verification failure.
You need access to the Microsoft 365 Defender portal or the approved Exchange Online PowerShell workflow, plus permission to edit authoritative DNS for the sending domain. Keep a redacted copy of a newly delivered failing message, including its DKIM-Signature and receiver-added authentication results.
Copy DNS values from the account and domain you are configuring. Do not publish selectors, targets, tokens, or hostnames from another account or from an online example.
Microsoft's DKIM configuration documentation states that custom domains are not signed until configured. Do not assume that a working onmicrosoft.com signature means your visible business domain is also signed.
Which setup method should I use?
Use Microsoft 365's generated CNAME records for the exact custom domain or subdomain that sends the affected mail. Example values are only illustrations, so retrieve the actual values from your tenant's DKIM configuration rather than copying a record from another domain.
The current workflow is documented through the Microsoft 365 Defender portal DKIM configuration process. Current authenticated portal labels and actions can change, so verify the displayed domain and generated selector values in the tenant before publishing DNS.
Use the domain-specific configuration when the visible From address is user@yourdomain.com. Configure a subdomain separately when the affected From address uses that subdomain. Do not replace an active selector to make it resemble an example.
How do I configure SPF and DKIM for Microsoft 365?
1. Open the Microsoft 365 DKIM configuration
Open the DKIM configuration process for the custom domain in the Microsoft 365 Defender portal, following Microsoft's current DKIM instructions. Confirm the selected domain matches the visible From domain in the failing message.
Microsoft's published workflow also supports obtaining the configuration through Exchange Online PowerShell. Use the approved administrative path for your organization, but do not treat a portal status alone as proof that a delivered message verifies.
2. Select the exact sending domain
Select the custom domain or subdomain used by the affected message. Microsoft 365 maintains two generated public-private key pairs for each configured domain or subdomain, and one selector is active at a time.
Record the selected domain, active selector, DNS zone owner, change approver, and test mailbox. This gives you a clear comparison point if the original message uses a different d= or s= value.
3. Publish the generated CNAME records
Microsoft provides two account-specific CNAME records. Publish the exact record owners and targets generated for the tenant. The following shape is illustrative only and is not a Microsoft 365 record you can reuse.
Record type: CNAME
Host: selector1._domainkey.yourdomain.com
Value, illustrative only:
<tenant-generated-selector1-target>Record type: CNAME
Host: selector2._domainkey.yourdomain.com
Value, illustrative only:
<tenant-generated-selector2-target>Do not publish these placeholders. Copy the complete CNAME owners and targets generated in the Microsoft 365 tenant for the selected domain.
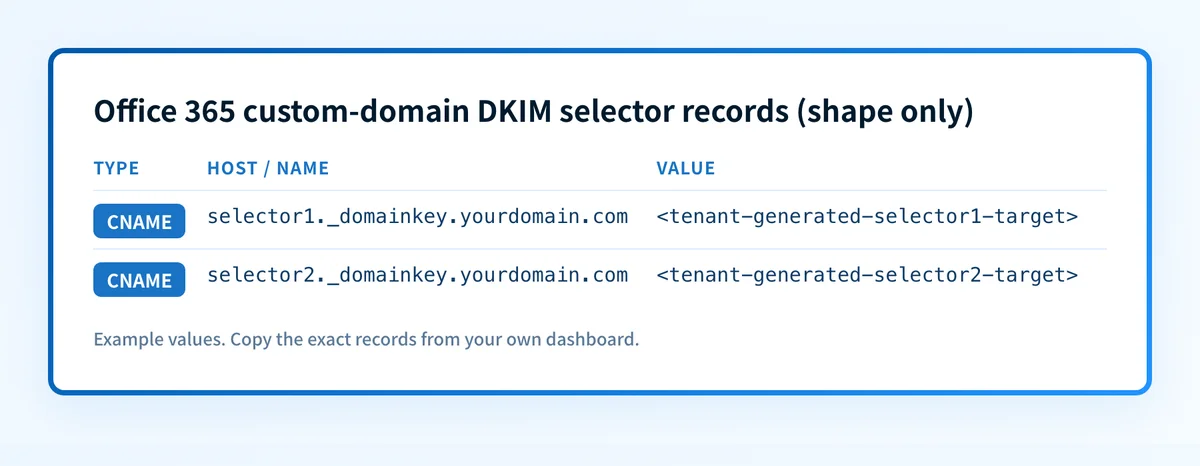
Some DNS providers append the zone name to a host field automatically. Check the final fully qualified owner name after saving. Pasting selector1._domainkey.yourdomain.com into a field that appends yourdomain.com can create a duplicated owner name.
Do not add a second unrelated record at the same owner without checking the existing DNS state. A CNAME cannot coexist with other DNS data at the same owner name, a general DNS rule set out in RFC 1034. SPF is separate from DKIM: preserve an existing SPF TXT record and update it only when your actual Microsoft 365 sending path requires it.
4. Verify the domain in Microsoft 365
Return to the tenant's DKIM configuration after the CNAME records resolve publicly and complete the documented enablement action for the selected domain. Microsoft uses the d= value in DKIM-Signature to identify the signing domain and retrieves the public key through the DKIM DNS record.
A successful Microsoft 365 status indicates that the tenant accepted the current DNS configuration. It does not establish that every mail route uses that signer or that a previously delivered message will now verify.
5. Send a real test message
Send a new message from the exact production mailbox and route that produced the failure. Deliver it to a mailbox where you can inspect raw source. Do not use a message sent before the configuration change.
Keep the original failing message and the new test separate. Compare their visible From domains, DKIM-Signature values, and trusted receiver-added results. The difference may show that the failure belongs to a distinct sending route rather than the Microsoft 365 DKIM configuration.
Investigate this with your coding agent
Use this when DNS records or mail-routing configuration are managed as code, or when you have a redacted failing .eml file. Prepare only redacted headers, public DNS data, and non-secret routing configuration.
Agent handoff
Copy the prepared prompt
Give this to a coding agent that can inspect the relevant repository or configuration source of truth.
Problem: A Microsoft 365 message reports a DKIM body hash verification failure.
Evidence: Redacted failing .eml headers, DKIM-Signature d= and s= values, public selector CNAME results, visible From domain, and redacted mail-routing configuration.
Repository scope: Inspect the DNS-as-code repository, DNS exports, and mail-routing configuration repository.
Constraints: Inspect before editing. Do not apply changes until I approve the proposed diff. Do not access or request private keys, tokens, unredacted headers, customer data, or production credentials.
Requested output: Diagnose the selector DNS result, signing-domain alignment, likely post-signing path boundary, minimal proposed change, rollback, and unknowns.
Verification: Compare a newly delivered message from the same production path with the selected domain's public selector record and trusted Authentication-Results.
Stop if: Credentials, private data, production mutation, or missing evidence is required.
Human approval required: Review the proposed diff and verification plan before allowing changes. Do not paste secrets, private keys, API tokens, unredacted headers, or customer data.
How does this setup affect DMARC?
DKIM contributes to DMARC only when the verified DKIM signing domain aligns with the visible From domain. Microsoft recommends that a message be DKIM-signed by the domain in the From address. A signature can be technically valid yet fail to provide an aligned DKIM result for DMARC.
Check the published DMARC policy with Palisade's DMARC checker before changing enforcement. A DMARC record check shows the published policy, not whether the particular Office 365 message passed DKIM or whether a recipient accepted it.
How do I validate the setup?
Check public DNS
Query the exact selector from the message:
<selector>._domainkey.<signing-domain>Confirm that authoritative DNS and a public resolver return the expected tenant-generated CNAME. You can also use the DKIM checker to inspect the published DKIM record.
dig +short CNAME <selector>._domainkey.<signing-domain>This verifies public DNS visibility. It does not prove that Microsoft 365 signed the affected message or that the message body stayed unchanged afterward.
Check the Microsoft 365 status
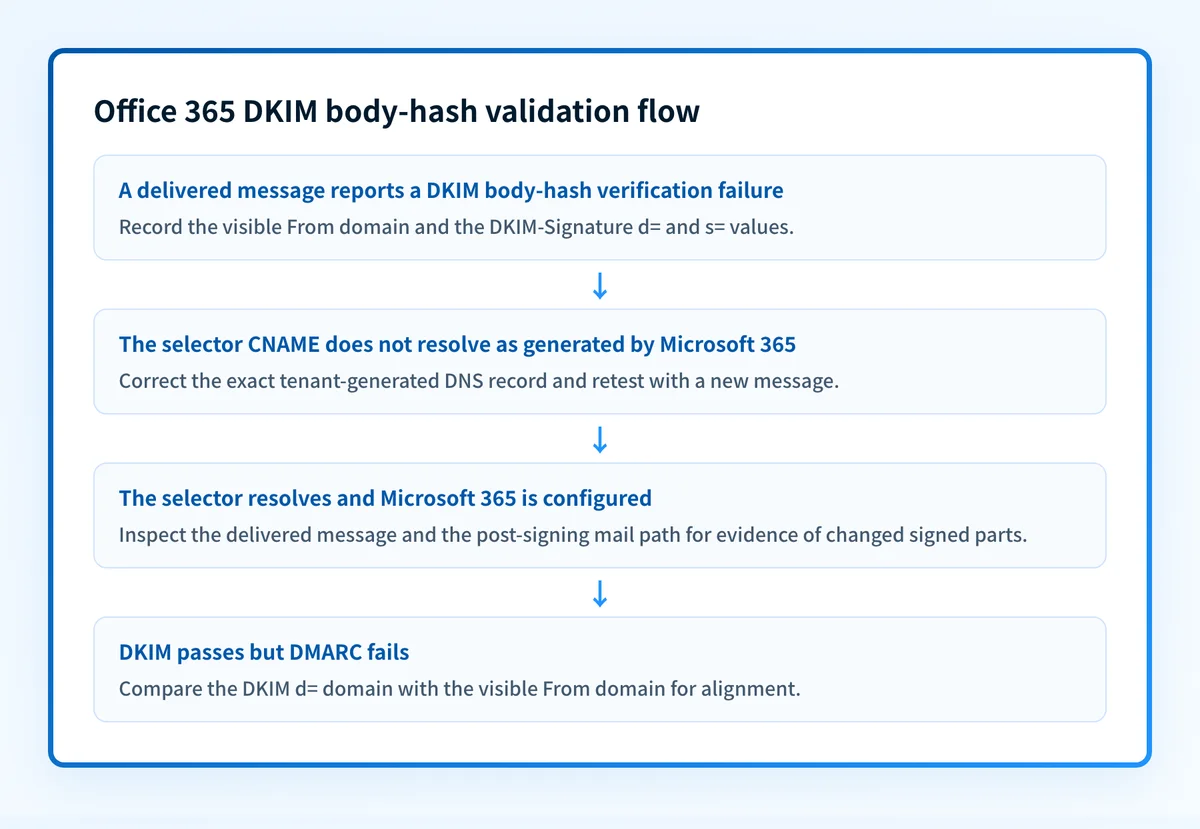
Confirm the selected domain's DKIM configuration in the Microsoft 365 tenant. Compare the selected domain with the d= domain in the delivered message.
A green status is useful configuration evidence. It is not a delivered-message check and cannot establish the signing behavior of a different mail route.
Inspect a delivered message
Inspect a new message's raw source. Find the DKIM-Signature header, then record its d= signing domain and s= selector. RFC 6376 defines DKIM's use of a signing domain and selector to locate the public key.
Then inspect the trusted receiver-added Authentication-Results field. RFC 8601 defines that field and its trust boundary. Do not trust an Authentication-Results header added by an untrusted intermediary.
Review DMARC reports
After aggregate reports accumulate, review whether Microsoft 365 traffic passes DKIM and aligns with the visible From domain. Separate Microsoft 365 traffic from other sources that send with the same domain. A body-hash failure in one route does not identify every source using that domain.
Troubleshooting
The selector record does not resolve
Compare the queried fully qualified selector owner with the tenant-generated CNAME owner. Check for a duplicated DNS suffix and for a record published in the wrong zone. Do not substitute a target from an online example.
Microsoft 365 shows DKIM configured, but the new message has no expected signature
Compare the message's sending path, visible From domain, and DKIM-Signature fields with the domain selected in Microsoft 365. The evidence may indicate a different sender or route. Microsoft documents that custom domains require their own DKIM configuration.
The message has a signature, but body hash verification fails
Treat this as a message-path investigation. A DKIM verifier calculates a body hash as part of validating the signature. The available evidence supports the inference that the verifier did not validate the signed body hash against the received body.
Microsoft states that the signature remains valid only while intermediate systems do not modify signed parts. Compare the original sent message, the delivered message, and documented routing boundaries. Do not change DNS blindly because DNS alone cannot establish where a signed body changed.
DKIM passes, but DMARC still fails
Compare the d= value with the visible From domain. Microsoft states that DKIM passes DMARC validation when the signing domain aligns with the From domain. A passing signature for an unrelated domain is not an aligned DKIM result.
Check the published selector behind the failure
The message header gives you the d= signing domain and s= selector to inspect. Run that domain through Palisade's DKIM checker to check the published record before changing Microsoft 365 DNS.
A public record lookup cannot reproduce the original message verification, identify a post-signing alteration point, repair the mail route, or guarantee future delivery. For an ongoing Microsoft 365 or multi-domain DMARC workflow, Palisade's agentic DMARC software analyzes aggregate-report data, identifies authentication and alignment issues, and creates prioritized remediation tickets. A human reviews the evidence and applies any policy or DNS change. Start with Palisade
Evidence
Sources and further reading
Questions readers ask
Frequently asked questions
How to fix DKIM signature body hash not verified?
A DKIM signature body hash not verified result requires investigation before a fix. Inspect the original message's DKIM-Signature values, resolve the corresponding selector record, and investigate whether a system changed signed message parts after signing. Microsoft states that modifying signed parts can invalidate a DKIM signature.
How to enable DKIM for Office 365?
Configure DKIM for each Microsoft 365 custom sending domain or subdomain, then publish the account-generated CNAME values Microsoft provides. Do not reuse example targets. Microsoft states that outbound mail from custom domains is not DKIM-signed until configured.
How to fix a DKIM failure?
Not with one universal change. Identify the signing domain through d=, identify the selector through s=, retrieve the public key through DNS, and determine whether the signed message parts changed. DNS changes are appropriate only when the DNS evidence supports that branch.
How to manually verify DKIM signature?
Only at a conceptual level with the available sources. Use the d= signing domain and s= selector in DKIM-Signature to locate the public key, then verify the cryptographic signature against the signed message. RFC 6376 defines this mechanism, but the available documentation does not provide a Microsoft-specific manual verification procedure for this error.
Does a Microsoft 365 DKIM status prove the message body was unchanged?
No. Microsoft 365 status shows that the tenant accepted the current DKIM configuration for the selected domain. Inspect a newly delivered message and its trusted authentication results to determine whether that production path verifies.
Check the Microsoft 365 DKIM public key for the selector
Enter your domain and selector.

Written by
Samuel ChenardCEO & Co-Founder, Palisade
Samuel Chenard is the CEO and co-founder of Palisade, agentic DMARC software for IT teams and MSPs, from one domain to thousands.
More from Samuel →