HubSpot DKIM setup: connect and verify your sending domain
 ChatGPT
 Claude
 Gemini
 Perplexity
 Grok
In brief
HubSpot DKIM setup: connect your sending domain, publish two account-generated CNAME records, verify HubSpot, and validate a real sent message.
HubSpot DKIM setup starts in Settings > Content > Domains & URLs > Email Sending > Connect sending domain. Connect the marketing-email sending domain, publish the two account-generated DKIM CNAME records HubSpot displays, then wait for HubSpot to authenticate the domain and inspect a newly delivered marketing email. The CNAME hosts and targets are specific to your HubSpot account and domain, so copy them only from the account you are configuring.
At a glance
Quick takeaways
- HubSpot requires Domain settings permissions to connect an email sending domain.
- The connected sending subdomain should match the domain used in the marketing email's From address.
- HubSpot DKIM requires two account-generated CNAME records.
- HubSpot's workflow also checks MX, SPF, and DMARC records, which are separate from the DKIM CNAME records.
- A HubSpot status of Partially authenticated means DKIM is verified but SPF or DMARC still needs verification.
- Public DNS, HubSpot status, a delivered message, and DMARC reports answer different validation questions.
What should I check before configuring HubSpot?
Confirm that HubSpot sends the marketing emails in scope. This workflow applies to HubSpot marketing email, not necessarily transactional mail sent by another platform or mailbox-hosted employee mail. For broader sender-specific setup guidance, see the ESP setup hub.
HubSpot's email sending domain documentation states that Domain settings permissions are required. You also need access to the DNS provider and ownership of every domain you connect.
Choose the sending domain carefully. HubSpot says the connected subdomain should match the domain in the marketing email's From address. A root domain is appropriate only when it is not hosting content. Record the current From domain, DNS zone owner, HubSpot administrator, and a test mailbox before making changes.
Copy DNS values from the account and domain you are configuring. Do not publish selectors, targets, tokens, or hostnames from another account or from an online example.
If the domain uses Cloudflare, HubSpot says domain-wide CNAME flattening and proxy settings must be turned off for this configuration. A proxied or flattened CNAME can prevent HubSpot from reading the record it expects.
Which setup method should I use?
Use HubSpot's DNS-provider sign-in option only when the approved DNS administrator permits that connection. Otherwise, choose No, I'll set it up manually and provide the generated records through your normal DNS change process.
Both routes use values generated for the selected HubSpot account and sending domain. Manual setup gives the DNS owner a chance to review the proposed MX, DKIM, SPF, and DMARC changes before publication. DKIM is only one part of that four-record workflow. Read what email authentication is and why it matters before treating a DKIM pass as complete sender authentication.
Whichever route you choose, validate the sending path that currently delivers your HubSpot marketing email after DNS changes propagate.
How do I configure SPF and DKIM for HubSpot?
1. Open the email sending settings
In HubSpot, select the settings icon, then open Content > Domains & URLs > Email Sending > Connect sending domain.
Enter an email address used for HubSpot marketing email. HubSpot derives the sending domain and asks you to confirm it. Stop if the proposed domain does not match the visible From domain used by the messages you intend to test.
2. Select the sending domain and setup method
Confirm the derived sending domain, then choose DNS-provider sign-in or No, I'll set it up manually. HubSpot generates the records needed for that selected domain.
Keep the generated record screen open while preparing the DNS change. Do not substitute a value found in another HubSpot portal, a previous domain connection, or an online example.
3. Publish the DKIM CNAME records
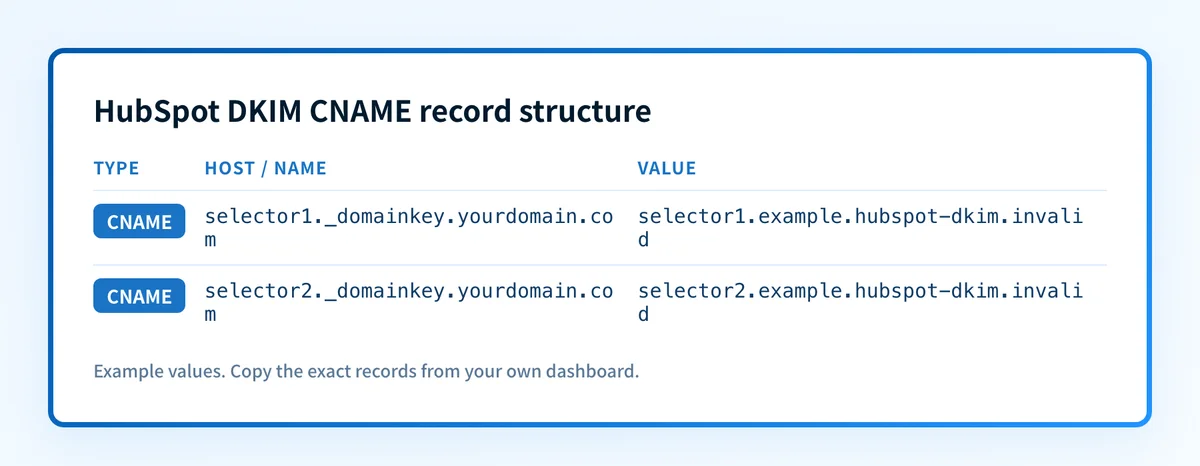
HubSpot documents that DKIM requires two CNAME records. Copy the two records shown in your account's Host and Required data columns exactly. The workflow can also show MX, SPF, and DMARC records. Do not mistake those records for the two DKIM CNAME records.
The example below shows the shape of a CNAME-based DKIM record only. It is illustrative and is not a HubSpot-generated value.
Record type: CNAME
Host (illustrative only):
selector1._domainkeyValue (illustrative only):
selector1.example.hubspot-dkim.invalidDo not publish this example. Copy both complete CNAME hosts and targets from HubSpot's Host and Required data columns for the selected account and sending domain.
Some DNS providers automatically append the zone name to the host field. If the DNS zone is yourdomain.com, entering selector1._domainkey.yourdomain.com into a field that appends the zone can produce a duplicated owner name. Check the fully qualified owner before saving.
Also inspect existing DNS data at each generated host. A CNAME cannot coexist with another DNS record at the same owner name. Do not overwrite an existing CNAME without confirming that it belongs to an obsolete HubSpot connection and that the change has an approved rollback path.
For SPF changes, do not create a second SPF TXT record. SPF evaluation requires the applicable SPF policy to be published as one record. Use the broader HubSpot SPF and DKIM setup guide when the HubSpot connection requires an SPF update.
4. Verify the records in HubSpot
Wait at least 20 minutes before checking the connection. HubSpot says DNS updates usually take 10 to 70 minutes but can take up to 48 hours.
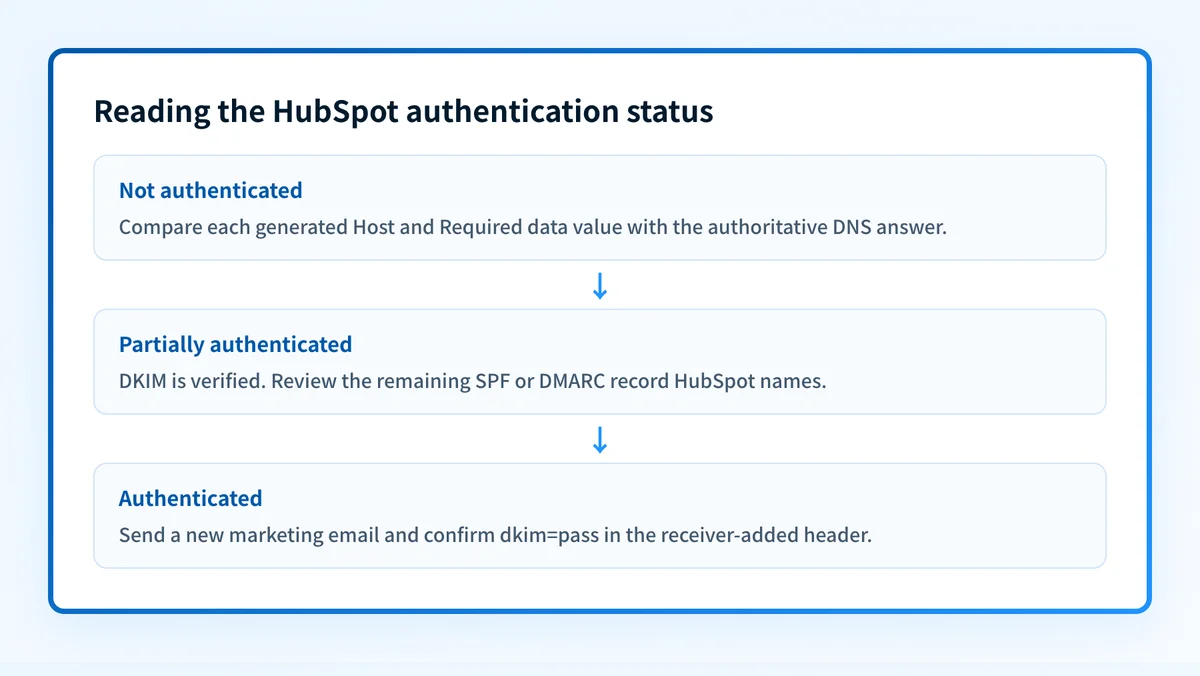
Return to the sending-domain connection and review the status. HubSpot uses Not authenticated, Partially authenticated, and Authenticated. According to HubSpot, Partially authenticated means DKIM is verified while SPF or DMARC still needs verification. If HubSpot identifies a record problem, select Continue setup to view the required DNS values again.
5. Send a real marketing-email test
Send a new HubSpot marketing email from the configured From domain to a mailbox where you can inspect raw message source. Use a message sent after HubSpot reports the new state. A message sent before the DNS change cannot validate the current configuration.
Inspect the delivered message for a DKIM-Signature and the receiver-added authentication result. RFC 8601 defines Authentication-Results and its trust boundary. Check a result added by the receiving mailbox system, not an untrusted header inserted earlier in transit.
How does this setup affect DMARC?
HubSpot DKIM contributes to DMARC only when the DKIM signing domain aligns with the visible From domain under the applicable DMARC alignment mode. A valid DKIM signature for an unrelated domain does not make the visible From domain pass DMARC.
HubSpot's connection workflow includes DMARC separately from DKIM. HubSpot's connection documentation says a subdomain is considered authenticated if a DMARC record is configured at the root domain level, citing DMARC policy inheritance. Use the DMARC checker to inspect the published DMARC record before changing policy. A public record lookup cannot prove that HubSpot has signed a message or that a receiving provider will place it in the inbox.
How do I validate the setup?
Check public DNS
Query the two exact CNAME owners HubSpot generated from an authoritative DNS server and a public resolver. HubSpot also documents an external DKIM lookup using the sending domain and smtpapi selector, but do not assume every account's generated CNAME hosts or targets are identical.
dig +short CNAME <hubspot-generated-host>.<sending-domain>
dig +short TXT smtpapi._domainkey.<sending-domain>
Use the DKIM checker as an additional public-DNS check. Its result shows what is publicly discoverable. It does not prove HubSpot is using the expected signing path.
Check the HubSpot status
Return to Content > Domains & URLs > Email Sending and confirm the current status for the selected domain. Authenticated confirms HubSpot accepted the DNS configuration it checks. Partially authenticated narrows the remaining issue to SPF or DMARC after DKIM verification.
A green HubSpot status is not proof that a delivered marketing email has the expected DKIM result.
Inspect a delivered message
Open raw source for the new test email. Confirm that the message includes a DKIM signature, then locate the trusted receiver-added Authentication-Results field and check for dkim=pass.
Also compare the signing domain with the visible From domain when DKIM is expected to satisfy DMARC. Save a redacted header copy with the DNS change record. Do not include recipient addresses, tracking URLs, tokens, or other customer data.
Review DMARC reports
After aggregate reports accumulate, review HubSpot traffic separately from other sending sources that use the same organizational domain. DMARC reports show whether the observed HubSpot mail passes authentication and alignment over time. They do not prove the fate of every individual message at every receiver.
Troubleshooting
HubSpot reports Not authenticated
Compare each generated Host and Required data value with the authoritative DNS response. Check for a missing CNAME, a copied target with a typo, a truncated value, or a DNS host that duplicated the zone name.
If the domain uses Cloudflare, confirm that domain-wide CNAME flattening and proxy settings are off, as HubSpot documents for this configuration.
HubSpot reports Partially authenticated
HubSpot documents that Partially authenticated means DKIM is verified but SPF or DMARC still needs verification. Do not replace the working DKIM CNAME records. Review the remaining SPF or DMARC record identified in HubSpot, then check whether the visible From domain and DMARC policy scope match the sending domain.
The DNS record exists but HubSpot cannot verify it
Confirm the record is a CNAME at the exact generated owner, not a TXT record copied from an unrelated DKIM setup. Compare authoritative DNS with a public resolver, then allow HubSpot's documented propagation window before changing the values again.
A delivered HubSpot message does not show DKIM pass
First confirm the message was sent after HubSpot authenticated the domain and that it used the intended HubSpot marketing-email path. Then compare the DKIM signature and receiver-added authentication result with the selected sending domain. The public DNS check alone does not establish which system signed a specific message.
DKIM passes but DMARC does not
Compare the DKIM signing domain with the visible From domain. DKIM can pass cryptographically while failing DMARC alignment. Inspect the published DMARC record and the message's authentication results before changing policy.
Check the HubSpot DKIM records, then cover the ongoing DMARC gap
Run your sending domain and a HubSpot selector through Palisade's DKIM checker after public DNS answers. The checker takes the domain and the selector, which is the part of the record name before ._domainkey, so for a generated host such as selector1._domainkey the selector is selector1. This validates that the records are publicly visible before you treat HubSpot's status as a completed sending-path test.
A public DKIM check cannot prove that HubSpot signed a particular production message, repair SPF or DMARC, monitor later sender changes, or guarantee inbox placement. Once aggregate reports begin arriving, Palisade can analyze DMARC report data, identify sending sources and authentication or alignment issues, and create prioritized remediation tickets. A human reviews the evidence and applies any DNS or DMARC policy change.
Evidence
Sources and further reading
Questions readers ask
Frequently asked questions
Does HubSpot DKIM require two CNAME records?
Yes. HubSpot states that DKIM requires two CNAME records. Generate and copy both records from the HubSpot account and sending domain you are connecting.
Can I copy HubSpot DKIM records from another portal?
No. HubSpot generates the CNAME hosts and target values for the account and selected sending domain. Copying records from another HubSpot account or domain can prevent authentication.
Does Partially authenticated mean HubSpot DKIM is working?
Only DKIM is verified. HubSpot documents that Partially authenticated means DKIM is verified, while SPF or DMARC still needs verification. Confirm the remaining record type before changing DNS.
Does a DKIM DNS lookup prove HubSpot is signing mail?
No. A DKIM DNS lookup shows that public DNS publishes a discoverable record. Inspect a newly delivered HubSpot marketing email and its trusted Authentication-Results field to validate the actual sending path.
Can a HubSpot sending subdomain use a DMARC record at the root domain?
Yes. HubSpot says a subdomain is considered authenticated if a DMARC record is configured at the root domain level, citing DMARC policy inheritance. Confirm the published policy and the delivered message's alignment result before relying on that outcome.
Check the HubSpot DKIM public key for the selector
Enter your domain and selector.

Written by
Samuel ChenardCEO & Co-Founder, Palisade
Samuel Chenard is the CEO and co-founder of Palisade, agentic DMARC software for IT teams and MSPs, from one domain to thousands.
More from Samuel →