HubSpot SPF and DKIM setup: connect and verify
 ChatGPT
 Claude
 Gemini
 Perplexity
 Grok
GrokIn brief
HubSpot SPF and DKIM setup: connect your sending domain, publish account-generated DNS records, verify HubSpot, and validate a real message.

Set up SPF and DKIM for HubSpot under Settings > Content > Domains & URLs > Email Sending, then select Connect sending domain. HubSpot provides two DKIM CNAME records and SPF data for the account and domain you connect. Publish those exact values in authoritative DNS, merge SPF into any existing SPF policy, complete the HubSpot check, and test a newly delivered marketing email. Do not reuse DNS values from another HubSpot account.
At a glance
Quick takeaways
- This process applies to HubSpot marketing email and automated marketing email, not connected inboxes, sequences, or transactional email.
- HubSpot generates two separate DKIM CNAME records for an email sending domain.
- A domain must publish one SPF policy, so add HubSpot's generated data to an existing
v=spf1record instead of creating another SPF TXT record. - Provider-assisted setup is available only for DNS providers HubSpot supports in the connection flow.
- HubSpot's authentication status confirms its DNS check. It does not prove a production message passes DKIM, SPF alignment, or DMARC.
- Validate DNS, HubSpot status, a delivered message, and DMARC aggregate reports as separate checks.
What should I check before configuring HubSpot?
Confirm that the domain is used for HubSpot marketing email and that you know the exact visible From domain you will test. HubSpot documents different sending paths for marketing email, connected inboxes, sequences, and conversations. This guide covers the marketing-email sending-domain path only.
You need access to the authoritative DNS zone and a HubSpot user who can connect or reconnect the domain. HubSpot's email sending-domain troubleshooting guidance identifies Super Admin or Domain settings permission for domain connection work.
Check the current DNS zone before making changes:
- Save the existing SPF TXT value, if one exists.
- Check whether either proposed DKIM host already has a DNS record.
- Confirm the DNS provider's host-field behavior. Some interfaces append the zone automatically, so pasting a full domain can create a duplicated owner name.
- Keep the DNS change and a test mailbox tied to the same production From domain.
Copy DNS values from the account and domain you are configuring. Do not publish selectors, targets, tokens, or hostnames from another account or from an online example.
Which setup method should I use?
Use Sign in with provider when HubSpot offers your authoritative DNS provider and you are authorized to approve the requested DNS changes. Use No, I'll set it up manually when your provider is unavailable, DNS changes require review, or your team manages DNS through a separate workflow. HubSpot documents both choices in its email authentication connection flow.
The account-specific records remain the source of truth in either path. If you use manual setup, copy every current Host and Required data field from the HubSpot domain connection screen.
For a comparable provider-specific workflow, see how to set up SPF and DKIM for Amazon SES. The same DNS safety rule applies, but do not substitute Amazon SES record values for HubSpot values.
How do I configure SPF and DKIM for HubSpot?
1. Open the Email Sending domain connection flow
In HubSpot, select the settings icon, then open Content > Domains & URLs > Email Sending. Select Connect sending domain. This documented path was verified from HubSpot's official documentation rather than an authenticated account.
Enter an email address that uses the From domain for the HubSpot marketing-email path. Do not connect a domain used only by another sender.
2. Select the sending domain you will validate
Confirm the selected domain before proceeding. A root domain and a subdomain can have separate DNS zones, SPF policies, DKIM records, and DMARC policy discovery.
Record the exact From address you will use for the final message test. The visible From domain is the identifier DMARC evaluates for alignment.
3. Select provider-assisted or manual setup
Choose the connection method that matches the DNS ownership model you checked earlier. If HubSpot can connect through the provider and you approve the change, review the DNS changes before accepting them. If you choose manual setup, keep the HubSpot record screen open while entering values in DNS.
Do not infer record values from a screenshot, documentation example, or another HubSpot portal. HubSpot generates values for the current account and connected domain.
4. Publish both account-generated DKIM CNAME records
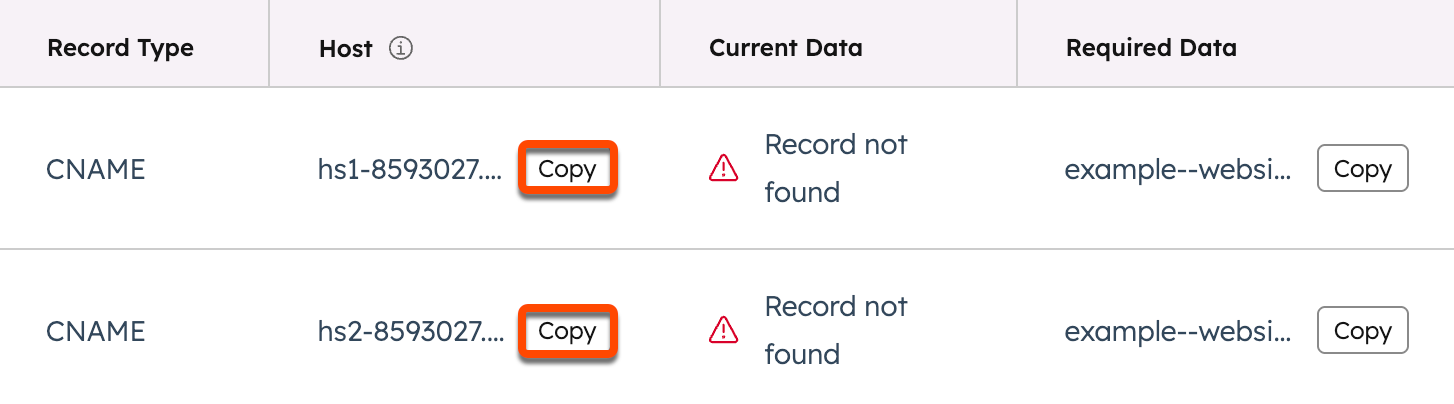
HubSpot's email-authentication instructions require two DKIM CNAME records. Copy the two host and target pairs separately. A CNAME cannot coexist with another DNS record at the same owner name.
Record type: CNAME
Host (illustrative only):
hs1-123456._domainkeyValue (illustrative only):
Copy the complete account-generated HubSpot CNAME target.Record type: CNAME
Host (illustrative only):
hs2-123456._domainkeyValue (illustrative only):
Copy the complete account-generated HubSpot CNAME target.Do not publish these examples. Generate and copy both complete host and target pairs from the HubSpot account and domain you are connecting.
The official HubSpot interface below shows separate DKIM rows with their own host, required-data, and copy controls.
If the DNS zone is managed through Cloudflare, follow HubSpot's documented DNS requirements. In particular, do not use a proxy for these authentication records, and check that domain-wide CNAME flattening does not alter the required answer.
5. Merge HubSpot SPF data into one SPF record
HubSpot displays the SPF data to use for the connected domain. Copy the complete current value from the HubSpot screen. It is account-specific.
Record type: TXT
Host (illustrative only):
@Value structure, illustrative only:
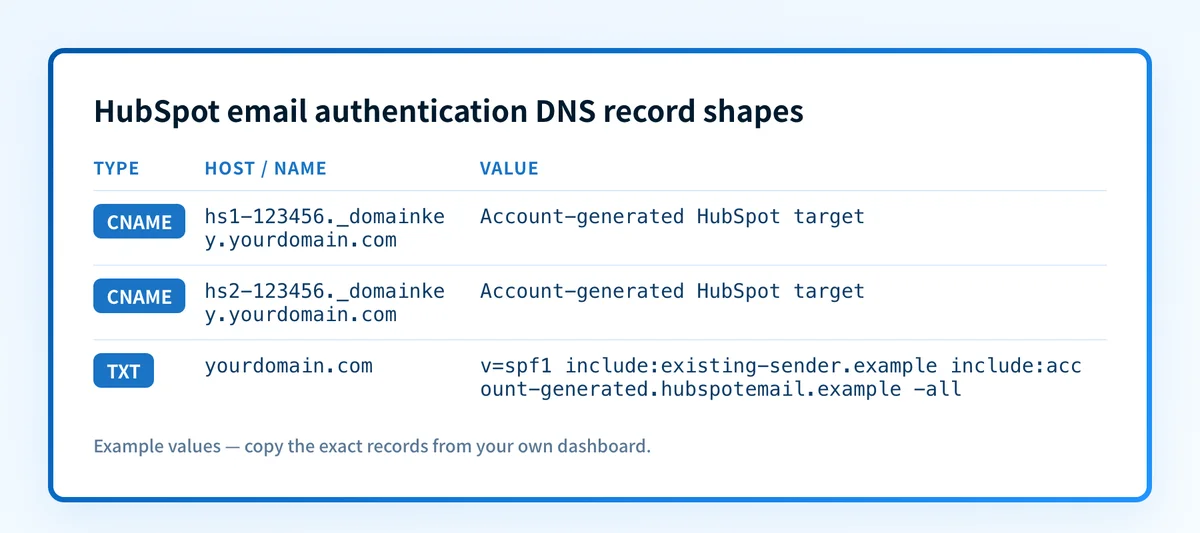
v=spf1 include:existing-sender.example include:account-generated.hubspotemail.example -allDo not publish this sample. Preserve the existing policy and add only the exact HubSpot SPF mechanism supplied in your account.
RFC 7208 specifies that SPF evaluation uses one SPF record. Creating a second TXT record beginning v=spf1 can produce an SPF PermError. Merge the generated HubSpot mechanism into the existing policy before its final ~all or -all mechanism. Review the policy's DNS-querying mechanisms as part of the change because SPF has a limit on DNS-term evaluation.
The record card below shows the ownership and separation to preserve: two DKIM CNAME owners and one root SPF policy.
6. Complete verification and send a new test message
Return to the HubSpot domain connection screen and continue its verification process after public DNS returns the expected records. Then send a new marketing email through the exact production path to a mailbox where you can inspect raw headers.
Do not test an older message. It may have been sent before HubSpot completed authentication or before the DNS change propagated.
How does this setup affect DMARC?
DMARC passes when SPF or DKIM passes and the authenticated identifier aligns with the visible From domain. RFC 9989 defines SPF and DKIM alignment for DMARC. A HubSpot DKIM result can satisfy DMARC when the DKIM d= domain aligns with that visible From domain. A passing SPF result for a different return-path domain does not satisfy SPF alignment.
Use the DMARC checker to inspect the published DMARC record before changing policy. A public record lookup does not show the exact HubSpot message path, a receiver's private evaluation, or future delivery results.
If you are building a wider vendor inventory, the vendor email authentication hub groups related setup guides, including how to set up SPF and DKIM for Brevo.
How do I validate the setup?
Check public DNS
Query each DKIM owner and the root-domain SPF policy through the authoritative DNS service and a public resolver.
dig +short CNAME hs1-123456._domainkey.yourdomain.com
dig +short CNAME hs2-123456._domainkey.yourdomain.com
dig +short TXT yourdomain.com
Replace the illustrative selector with the exact host HubSpot generated. Use the DNS lookup tool to inspect public answers, and use the SPF checker to review the published SPF policy. These checks confirm public DNS only. They do not prove HubSpot is using the records.
Check the HubSpot status
HubSpot presents status and record-specific diagnostics for the connected sending domain. Check that the account shows the expected authenticated state and that no required record remains unresolved.
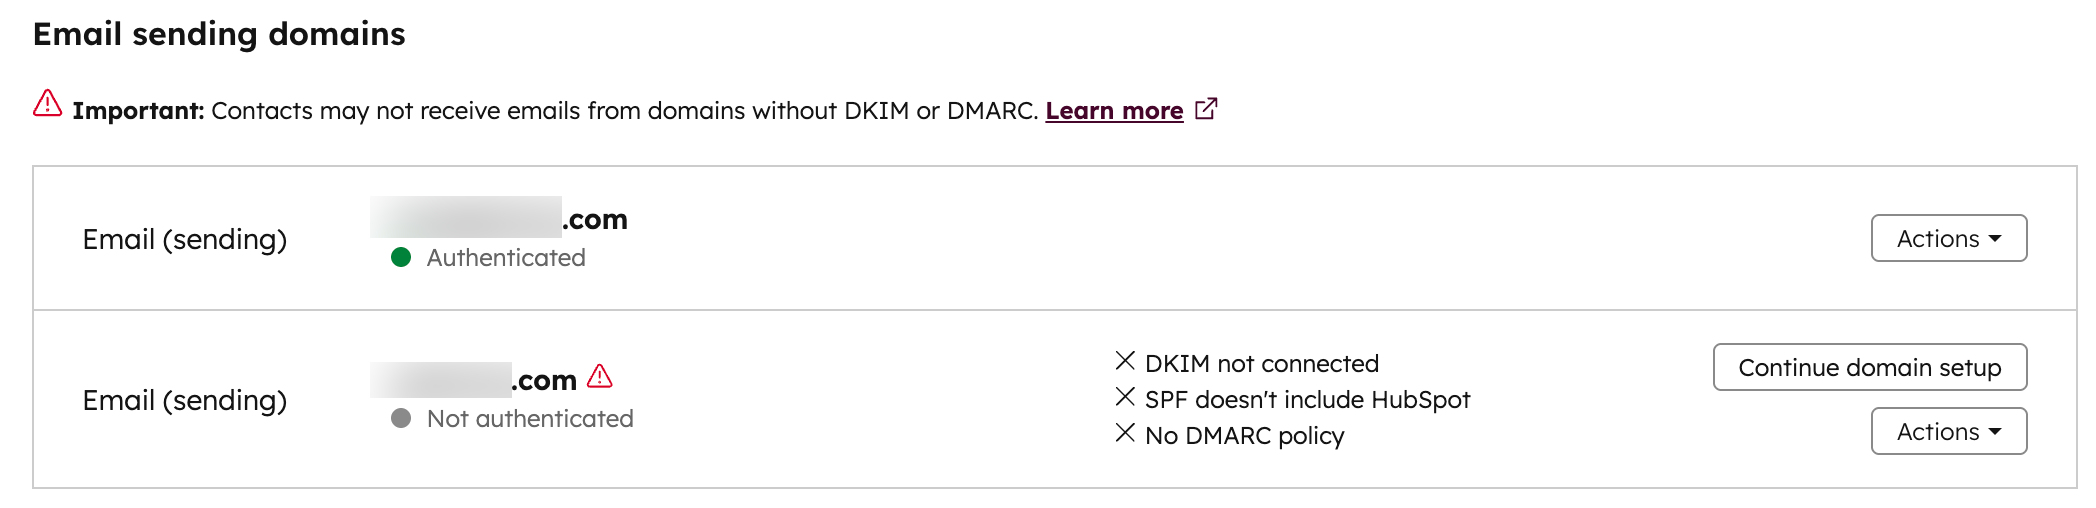
A green HubSpot status proves that HubSpot accepted its DNS check. It is not a delivered-message check and does not prove every outbound route signs or aligns the same way.
Inspect a delivered message
Open the raw source of the new test message. Confirm the expected d= domain and s= selector in DKIM-Signature, then inspect the receiver-added Authentication-Results field. RFC 8601 defines Authentication-Results and its trust boundary.
Accept the setup only when the trusted receiver result reports the expected DKIM pass and, where needed for DMARC, the passing DKIM domain aligns with the visible From domain. Keep a redacted header copy with the DNS change record.
Review DMARC reports
After aggregate reports accumulate, review HubSpot traffic separately from other sources that use the domain. Look for DKIM pass and alignment results for the HubSpot source. This layer identifies whether the live traffic matches the intended configuration over time.
Troubleshooting
HubSpot cannot find a required record
Compare the fully qualified DNS owner with the exact HubSpot host. A DNS provider that appends yourdomain.com can turn a full hostname into host.yourdomain.com.yourdomain.com.
Check authoritative DNS before editing again. If the public answer is correct but HubSpot remains pending, use HubSpot's domain troubleshooting steps and compare the complete target or TXT data character by character.
The DKIM CNAME record conflicts with an existing record
Stop before replacing it. A CNAME cannot share an owner with other DNS data. Determine which sender owns the existing record, then choose a non-conflicting provider workflow or complete its documented rotation process.
SPF returns multiple records or a PermError
Find every TXT answer beginning with v=spf1. Keep one policy and merge HubSpot's current generated mechanism into it. Do not remove another sender's include or change the final policy mechanism without understanding the existing mail flow.
HubSpot is authenticated but DMARC fails
Inspect a newly delivered message. Compare the visible From domain with the DKIM d= domain and the receiver's Authentication-Results. HubSpot status alone does not show whether the delivered message had an aligned identifier.
Cloudflare is altering the required answer
Review the record's proxy setting and the zone's CNAME-flattening behavior. HubSpot's authentication guidance specifies the DNS conditions needed for its records. Retest the public answer after each DNS correction.
Check the wider authentication posture for the sending domain
Run the production From domain through Palisade's Email Security Score after HubSpot shows the domain as authenticated and you have tested a real message. This checks the surrounding public authentication configuration that HubSpot's status page does not inventory.
A public score cannot prove the HubSpot production path, inspect private receiver decisions, or monitor future DNS changes. For an ongoing DMARC workflow, Palisade is agentic DMARC software that analyzes aggregate-report data, identifies sending sources and alignment issues, and creates prioritized remediation tickets. A human reviews the evidence and applies DNS or DMARC policy changes. Start with Palisade
Evidence
Sources and further reading
Questions readers ask
Frequently asked questions
Does HubSpot require two DKIM records?
Yes. HubSpot's email sending-domain connection flow provides two DKIM CNAME records. Publish both exact host and target pairs for the selected account and domain.
Can I add a second HubSpot SPF TXT record?
No. Publish one SPF policy beginning with v=spf1 for the domain. Add HubSpot's account-generated SPF mechanism to the existing policy rather than creating a separate SPF record.
Does this configure a connected HubSpot inbox?
No. This guide covers HubSpot marketing-email sending domains. Connected inboxes, one-to-one email, sequences, conversations inbox mail, and transactional email use different sending paths and may need separate authentication checks.
Does an authenticated HubSpot domain guarantee DMARC will pass?
No. HubSpot authentication confirms its DNS verification state. Check a real delivered message for the receiver's DKIM and SPF results, then confirm that a passing identifier aligns with the visible From domain.
How long should I wait before troubleshooting DNS verification?
Only troubleshoot after checking the authoritative and public DNS answers for the exact HubSpot-generated records. DNS publication time depends on the DNS provider and TTL. If the answers match HubSpot's current values but the status remains unresolved, follow HubSpot's documented domain troubleshooting process.

Written by
Dominic LandryDeliverability & DNS
Dominic Landry works on email deliverability and DNS configuration at Palisade, from SPF and DKIM records through to DMARC enforcement.
More from Dominic →