How to set up DKIM keys in Salesforce
 ChatGPT
 Claude
 Gemini
 Perplexity
 Grok
GrokIn brief
DKIM keys in Salesforce: create primary and alternate CNAME records, activate signing, and validate DNS, headers, and DMARC reporting for Salesforce email.

To set up DKIM keys for Salesforce platform email, open Setup > DKIM Keys, select Create New Key, then publish the primary and alternate CNAME records Salesforce generates before activation. This path is verified from Salesforce's Create a DKIM Key documentation. The selectors and CNAME targets are specific to your Salesforce org and sending domain. Do not reuse values from another org, example, or Salesforce product.
At a glance
Quick takeaways
- Salesforce platform email creates a primary and alternate DKIM CNAME record for each configured key.
- Both CNAME records need to remain published for Salesforce-managed key rotation.
- Salesforce documents a 2048-bit RSA key recommendation unless a particular application requires a smaller key.
- This workflow covers Salesforce platform email, not Marketing Cloud or Salesforce-connected mailbox integrations.
- A Salesforce active status does not prove that a new production message has a valid DKIM signature.
- DKIM supports DMARC only when the DKIM signing domain aligns with the visible From domain.
What should I check before configuring Salesforce?
Confirm that Salesforce platform email is the sender you need to authenticate. This guide does not cover Marketing Cloud, Marketing Cloud Advanced, Gmail or Office 365 integrations, Einstein Activity Capture, or Salesforce-owned sending domains. Those paths can use different sender-verification and authentication controls.
Salesforce lists the Customize Application permission for managing DKIM keys in its DKIM setup instructions. You also need access to the authoritative DNS zone for the domain in the visible From address, or an approved DNS owner who can publish the records.
Record the Salesforce org, the sending domain, the DNS zone, the approver, and a test mailbox where you can inspect raw headers. If Salesforce sends from a subdomain, treat it as separate scope. Salesforce says that sending subdomains need separate DKIM keys.
For broader context on vendor-managed authentication, see the vendor email authentication hub.
Copy DNS values from the account and domain you are configuring. Do not publish selectors, targets, tokens, or hostnames from another account or from an online example.
Which setup method should I use?
Use the primary and alternate CNAME records generated by Salesforce for the selected domain. Salesforce manages the signing key material. Your DNS records delegate the public-key lookup location to Salesforce instead of publishing a DKIM TXT key directly.
Choose selectors that do not collide with existing selectors for another sender. Salesforce documents primary selector, alternate selector, domain, RSA key size, and domain match pattern fields. For a domain you own, Salesforce instructs administrators to use an exact domain match pattern rather than a wildcard.
A dedicated IP does not replace DKIM. IP assignment and domain signing are separate controls. Select the domain that appears in the visible From address for the Salesforce platform email path under review.
How do I configure SPF and DKIM for Salesforce?
Salesforce platform DKIM setup creates CNAME records. It does not add an SPF record to your DNS zone. Do not publish a second SPF TXT record. SPF permits one record per domain, so review the existing SPF policy separately if Salesforce is expected to send mail using that domain.
1. Open DKIM Keys in Salesforce Setup
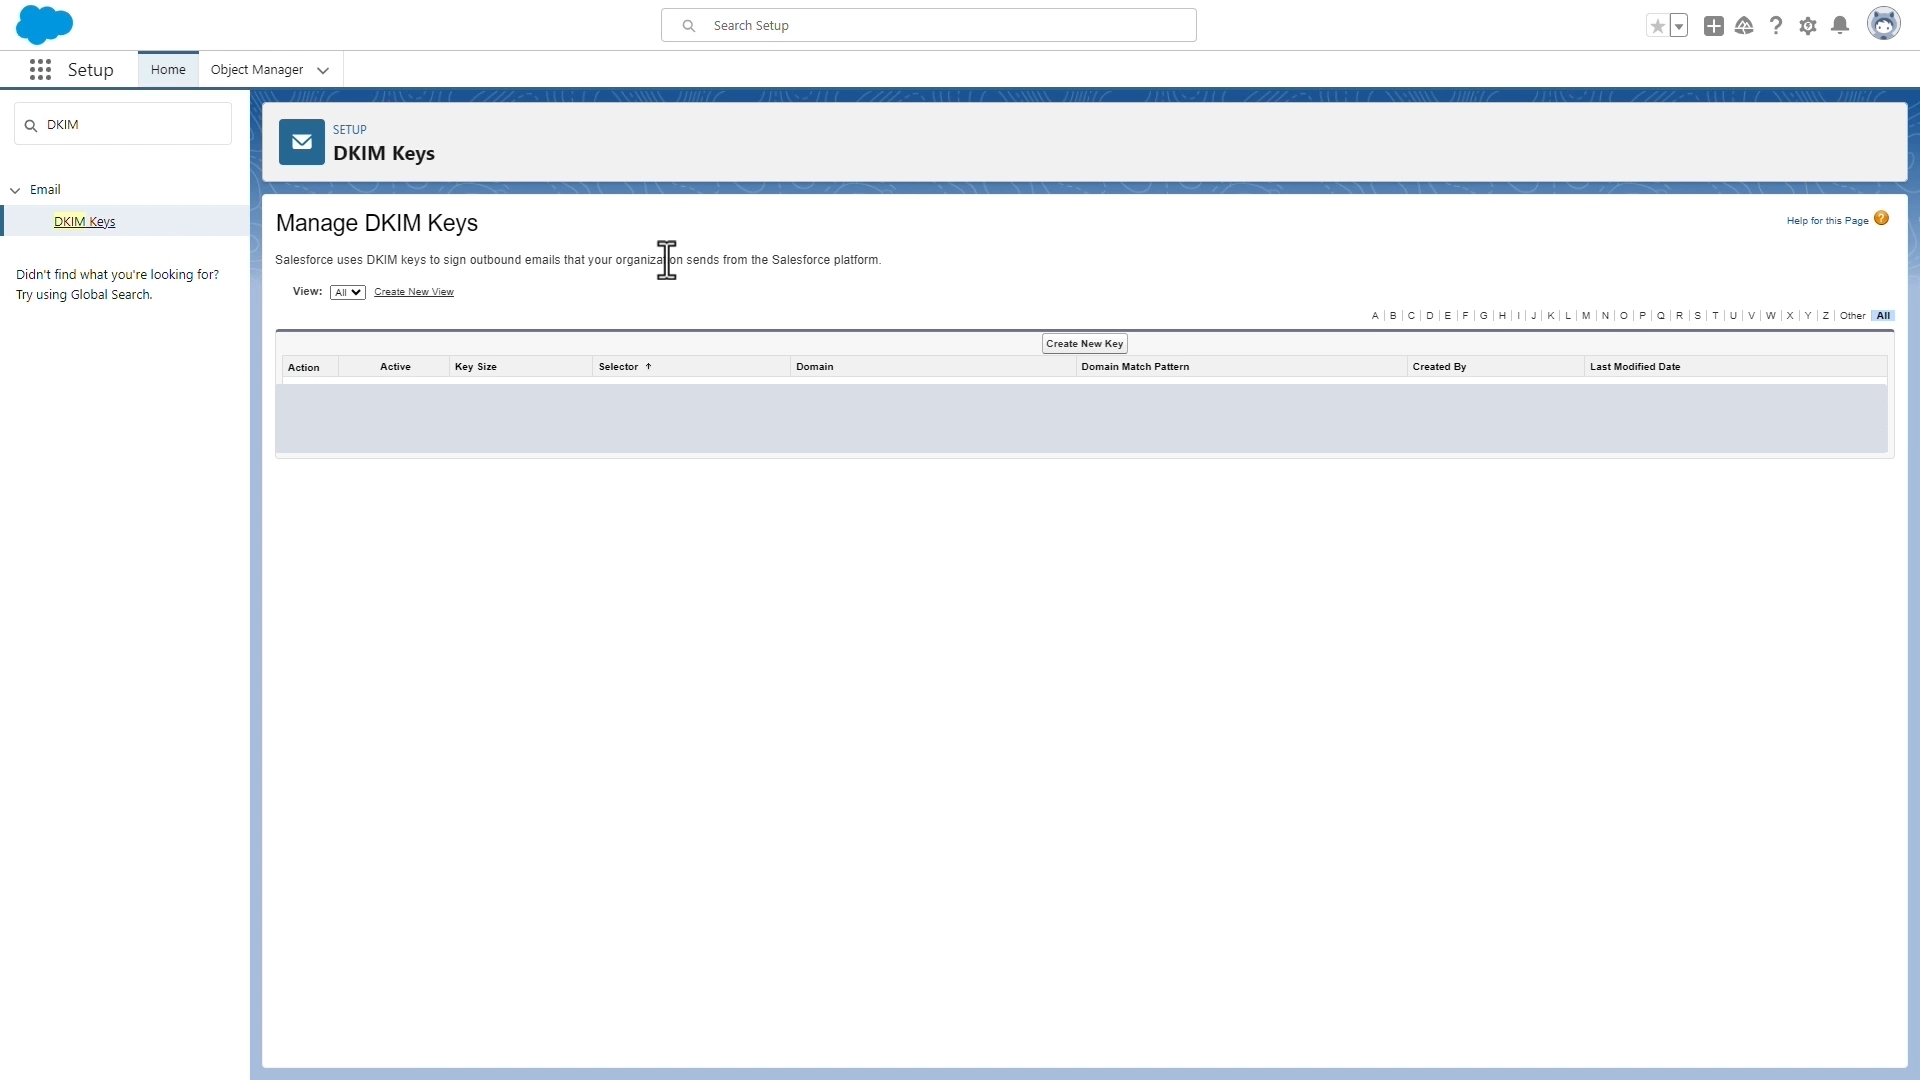
In Salesforce, open Setup, enter DKIM Keys in Quick Find, select DKIM Keys, then select Create New Key. This is the path in Salesforce's current setup documentation.
Check that you are in the intended Salesforce org before creating a key. Sandbox and production orgs can generate different configuration values.
2. Select the sending domain and selectors
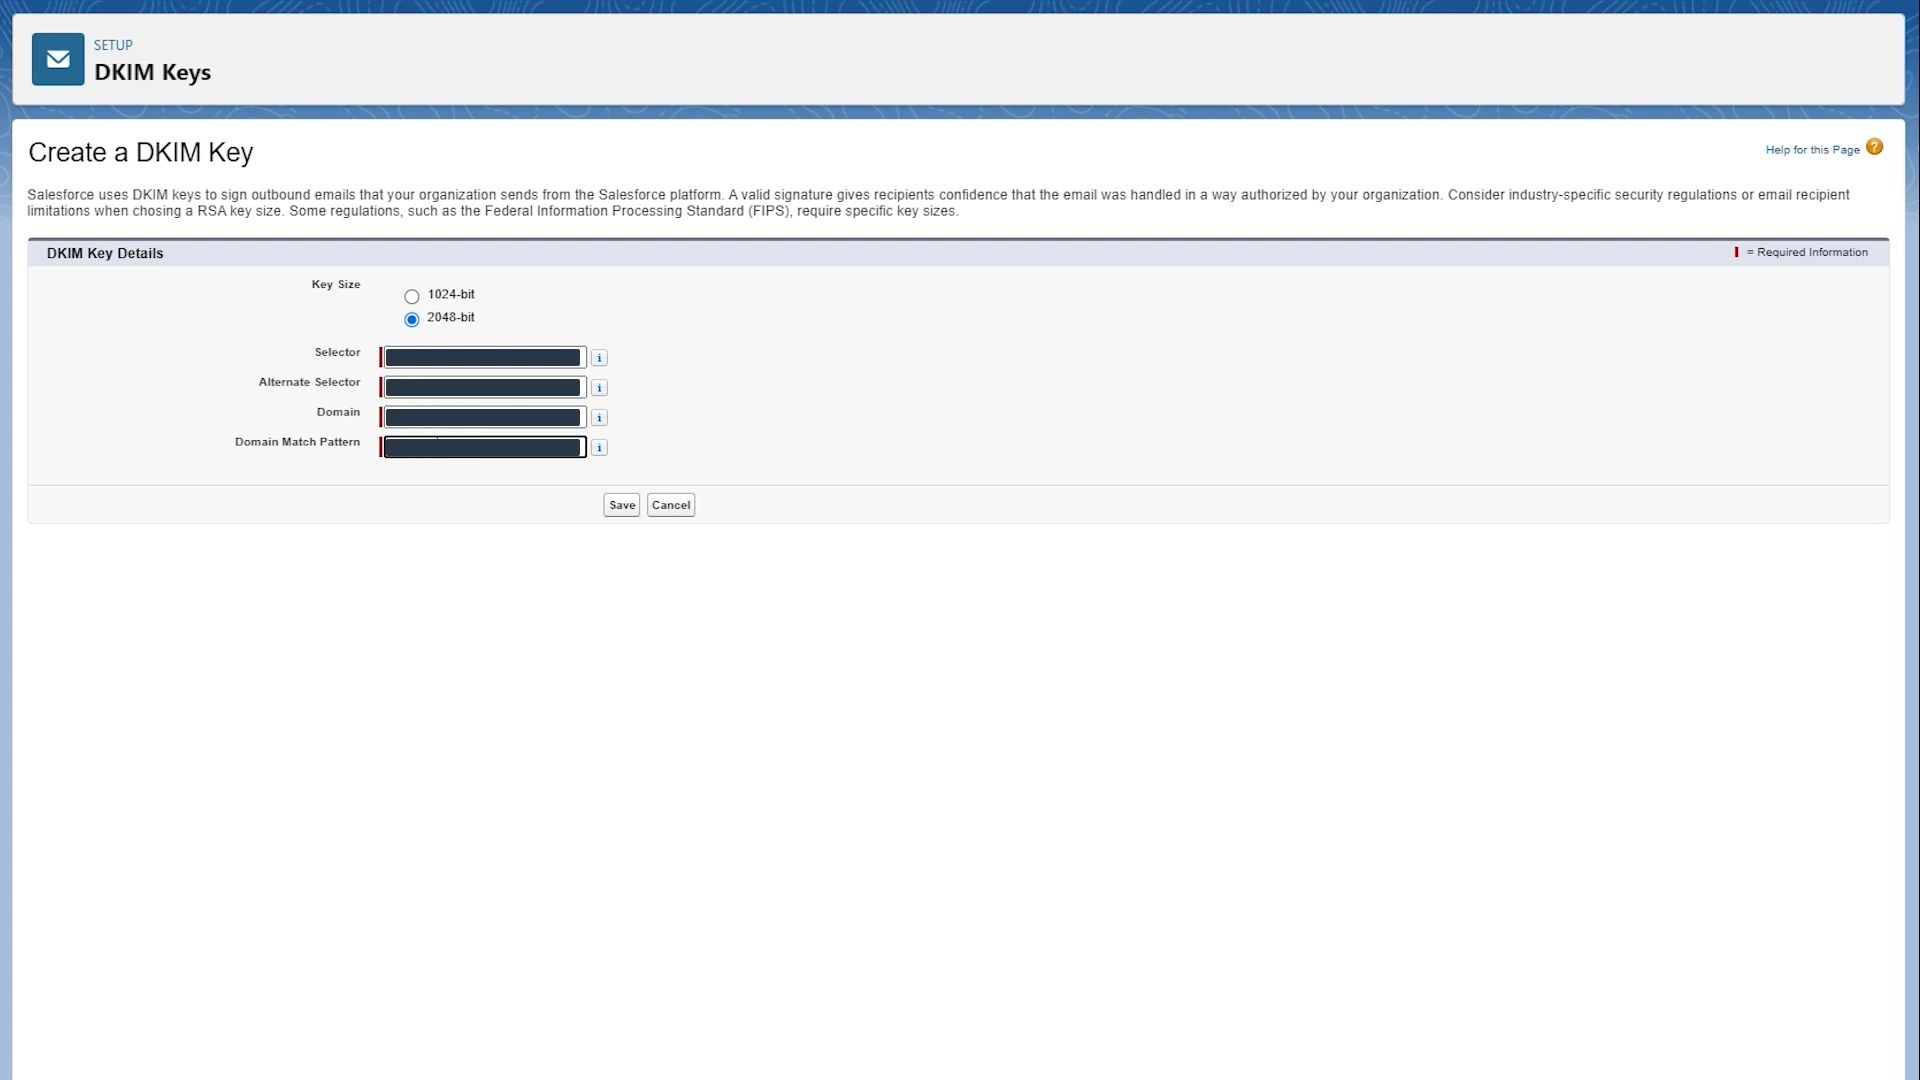
Enter the domain used in the visible From address. Choose a primary selector and an alternate selector that do not already exist in the DNS zone. Select the RSA key size and domain match pattern Salesforce documents for the type of domain you are configuring.
The Salesforce form below shows the key-creation fields. It is evidence of the interface path, not a source of reusable selector names or CNAME targets.
3. Publish both Salesforce-generated CNAME records
Open the new key's details page and copy both generated record pairs: the primary CNAME owner and target, then the alternate CNAME owner and target. Salesforce documents both records as part of the setup and says its corresponding records usually finish publishing within 15 minutes. Your DNS provider and resolver caches can add delay.
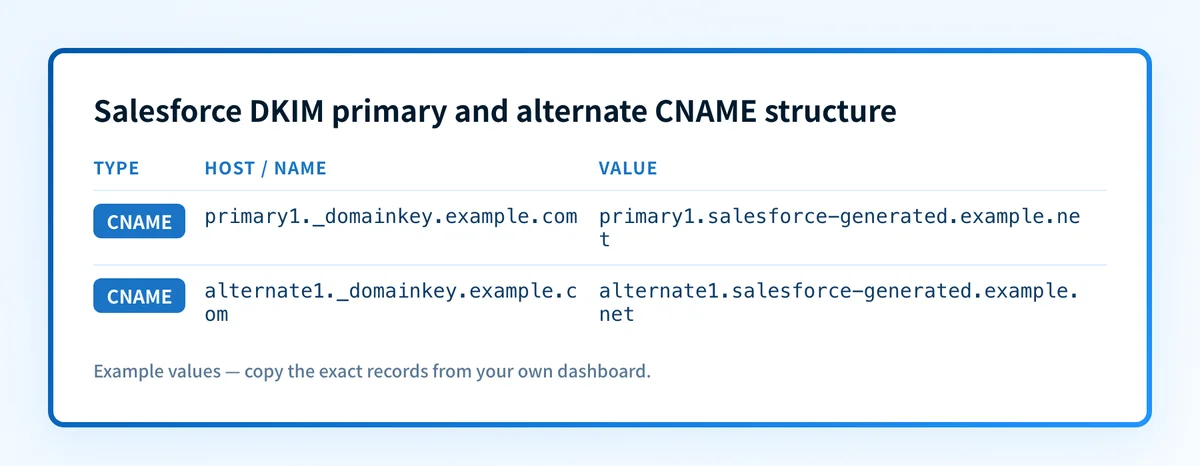
The following shapes are illustrative only. They are not Salesforce values and cannot authenticate mail.
- Record type:
CNAME - Host:
primary1._domainkey.example.com - Value:
primary1.salesforce-generated.example.net- Record type:
CNAME - Host:
alternate1._domainkey.example.com - Value:
alternate1.salesforce-generated.example.netDo not publish these examples. Copy both complete hosts and targets from the DKIM Key Details page in your own Salesforce org.
Some DNS providers append the zone name automatically. If the zone is example.com, entering primary1._domainkey.example.com in a host field that appends the zone can create a duplicated owner name. Inspect the final fully qualified owner before saving.
A CNAME cannot coexist with a TXT record or other DNS data at the same owner. If a selector already belongs to another sender, do not overwrite it. Choose a different Salesforce selector or use that sender's documented rotation process. For more detail on this record type, see how DKIM CNAME records work.
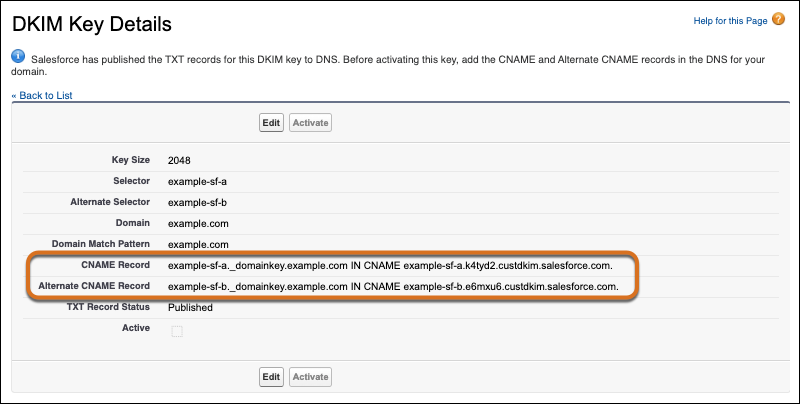
4. Verify DNS and activate the key
Query both CNAME owners after publishing them. Compare the authoritative DNS response and at least one public resolver with the complete targets shown in Salesforce. Activate the key only after Salesforce detects the records.
Salesforce warns that DNS changes can take up to 72 hours to propagate in relevant cases. A DNS-provider confirmation screen is not enough evidence. If Salesforce cannot detect the records, compare the complete owner and target before changing the zone again.
5. Send a real message through Salesforce
Send a new message through the exact Salesforce production path to a mailbox where you can view raw source. Do not use a message sent before activation.
Inspect the message for a DKIM-Signature header with the expected selector and signing domain. Then inspect the receiver-added authentication result. RFC 8601 defines Authentication-Results and its trust boundary.
Investigate this with your coding agent
Use this after Salesforce generates both CNAME pairs when your DNS zone is managed as code. Provide only the generated host and target values and current public DNS answers.
Agent handoff
Copy the prepared prompt
Give this to a coding agent that can inspect the relevant repository or configuration source of truth.
Problem: The Salesforce DKIM primary and alternate CNAME records must be present in the authoritative DNS source without selector collisions.
Evidence: PRIMARY_HOST, PRIMARY_TARGET, ALTERNATE_HOST, ALTERNATE_TARGET, ZONE, and redacted current authoritative and public CNAME answers.
Repository scope: The DNS zone configuration, its tests, and the deployment runbook.
Constraints: Inspect before editing. Do not apply changes until I approve the proposed diff. Do not access Salesforce, credentials, private keys, tokens, or make changes outside the two Salesforce-generated CNAME records.
Requested output: Current-state diagnosis, minimal proposed change, selector collision checks, rollback steps, missing inputs, and unknowns.
Verification: Query both CNAME owners against the authoritative server and a public resolver, then compare the answers with the Salesforce-generated targets before activation.
Stop if: Generated values are missing, a selector collision exists, the DNS zone is outside the repository, credentials or private data are required, or any production mutation is needed.
Human approval required: Review the proposed diff and verification plan before allowing changes. Do not paste secrets, private keys, API tokens, unredacted headers, or customer data.
How does this setup affect DMARC?
A valid DKIM signature supports DMARC only when the d= domain aligns with the visible From domain. RFC 9989 defines DKIM identifier alignment for DMARC. A passing Salesforce signature for an unrelated domain does not create a DKIM-aligned DMARC pass.
Salesforce documents that it rotates active DKIM keys every 30 days through the alternate key. Keep both generated CNAME records published so the alternate key remains available during rotation. Review DKIM key rotation guidance separately when another DNS-managed sender also uses the domain.
Use the DMARC checker to inspect the domain's published DMARC policy before changing enforcement. A public policy lookup does not prove that Salesforce messages pass alignment.
How do I validate the setup?
Check public DNS
Look up each exact CNAME owner generated by Salesforce. Confirm the authoritative DNS server and at least one public resolver return the expected target.
dig +short CNAME <primary-selector>._domainkey.<sending-domain>
dig +short CNAME <alternate-selector>._domainkey.<sending-domain>
Check the Salesforce status
Return to the DKIM Key Details page and confirm the selected key is active. This confirms that Salesforce accepted the DNS configuration for that key. It does not prove a particular production route is signing messages.
Inspect a delivered message
Inspect a new message sent through Salesforce. Confirm that DKIM-Signature includes the expected s= selector and d= signing domain, then check the trusted receiver-added result for dkim=pass.
Accept the message-level result only when the signing domain aligns with the visible From domain if DKIM is expected to satisfy DMARC.
Review DMARC reports
After DMARC reports accumulate, review Salesforce traffic separately from other sources using the domain. DMARC aggregate reports can show whether the source passes DKIM and aligns over a reporting window. They do not replace the immediate DNS, Salesforce, and delivered-message checks.
Troubleshooting
Salesforce does not show Activate
Confirm that both generated CNAME records resolve publicly to the exact targets shown in the Salesforce key details. Check for a duplicated zone suffix and compare the authoritative answer before waiting for propagation.
A CNAME record cannot be saved
Inspect the existing DNS owner. A CNAME cannot share its owner name with a TXT record, another CNAME, or other DNS data. Do not delete another sender's selector to make room for Salesforce.
Salesforce is active but DKIM fails in a message
Verify that the message came through the Salesforce path that the key covers. Compare its s= selector and d= domain with the key details, then inspect whether an outbound gateway modified the message after signing.
DKIM passes but DMARC fails
Compare the d= value in the DKIM signature with the visible From domain. A valid DKIM signature can still fail DMARC alignment when the domains do not align.
The alternate selector is missing
Restore the alternate CNAME from the values generated by the same Salesforce org. Salesforce uses the alternate key for its documented rotation process. Do not substitute a target from another org.
Check both Salesforce selectors before activation
Run the sending domain and each Salesforce selector through the Palisade DKIM checker, then compare the public CNAME result with the account-generated values in Salesforce. This resolves the public-DNS question left after you publish the two records.
A point lookup cannot inventory every sending source or show authentication behavior across a reporting window. Palisade is agentic DMARC software that analyzes DMARC aggregate reports, identifies authentication and alignment issues, and creates prioritized remediation tickets for a human to review. It does not change Salesforce settings or DNS, activate a key, guarantee signing or alignment, or control a receiver's decision.
If you need that ongoing report-based view after the selector check, Start with Palisade.
A DNS lookup cannot prove production signing, message-level alignment, or receiver handling.
Evidence
Sources and further reading
Questions readers ask
Frequently asked questions
Does Salesforce DKIM use TXT records?
No. Salesforce platform email generates primary and alternate CNAME records for its DKIM configuration. Copy both account-generated CNAME owners and targets from the Salesforce DKIM Key Details page.
Do I need both Salesforce DKIM CNAME records?
Yes. Salesforce generates primary and alternate CNAME records, and its documented key rotation uses the alternate key. Keep both records published after activation.
Can I use the same selector for Salesforce and another email sender?
No. A selector owner cannot contain a Salesforce CNAME alongside another DNS record. Choose a unique selector or follow the existing sender's rotation process without overwriting active DNS data.
Does an active Salesforce DKIM key mean DMARC passes?
No. Salesforce activation confirms its key configuration, but DMARC also requires DKIM alignment with the visible From domain. Inspect a delivered message and later review DMARC aggregate reports.
Does this Salesforce DKIM setup apply to Marketing Cloud?
No. This guide covers Salesforce platform email. Marketing Cloud and other Salesforce-connected sending paths have separate configuration and verification behavior.
How often does Salesforce rotate DKIM keys?
Salesforce documents a 30-day rotation for active DKIM keys. The alternate CNAME record must remain published so Salesforce can use the alternate key during that process.

Written by
Dominic LandryDeliverability & DNS
Dominic Landry works on email deliverability and DNS configuration at Palisade, from SPF and DKIM records through to DMARC enforcement.
More from Dominic →