How do I create a BIMI record step by step?
 ChatGPT
 Claude
 Gemini
 Perplexity
 Grok
GrokIn brief
Set up BIMI step by step: enforce DMARC, create an SVG Tiny PS logo, choose a VMC or CMC, publish the TXT record, and troubleshoot display.

To create a BIMI record, first enforce DMARC across the organizational domain and subdomains, prepare an SVG Tiny PS logo, decide whether you need a Verified Mark Certificate (VMC) or Common Mark Certificate (CMC), and publish a TXT record at default._bimi.example.com.
A complete record looks like this:
v=BIMI1; l=https://example.com/bimi-logo.svg; a=https://example.com/mark-certificate.pemBIMI lets participating mailbox providers retrieve an authenticated brand logo. A valid record makes display possible; it does not guarantee that every provider or recipient will show the logo, and it is not an inbox-placement guarantee.
BIMI setup checklist
Before publishing the record, confirm all five items:
- SPF and DKIM authenticate the organization's real sending streams.
- DMARC is at enforcement with
p=quarantineorp=reject, applied to 100% of mail; subdomains are also covered by an enforcement policy. - The logo is square, hosted over HTTPS, and saved as compliant SVG Tiny PS.
- The organization has chosen certificate-backed BIMI or understands the limited support for a self-asserted record.
- The logo URL and certificate URL, when used, are publicly reachable without authentication or redirects that break retrieval.
There is substantial room for early adopters: Palisade's State of DMARC 2026 dataset found that 87.3% of domains already meeting BIMI's DMARC-enforcement prerequisite had not published a BIMI record at the default selector.
Creating a BIMI Record
Creating a BIMI record involves a few key steps that we'll walk you through. Let's get started!
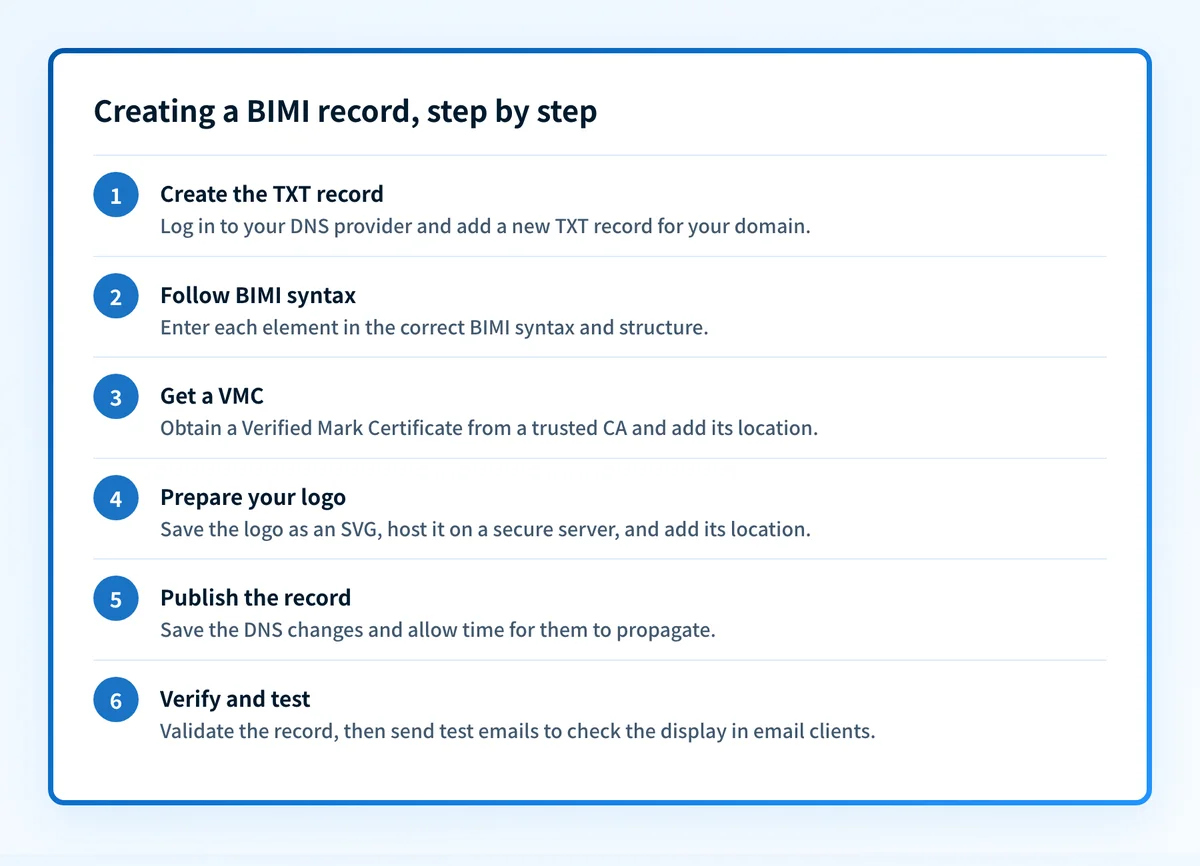 The full BIMI setup flow covered in this guide.
Generating the BIMI Record TXT Entry
To create a BIMI record, you need to generate a TXT entry in your DNS (Domain Name System). This record holds the necessary information for email clients to fetch and display your brand indicator image (BII). You can generate the TXT entry by following these steps:
- Log in to your DNS provider's control panel.
- Navigate to the DNS management section for your domain.
- Create a new TXT record for your domain.
- Enter the appropriate values according to the syntax and structure of the BIMI record.
Syntax and Structure of the BIMI Record
The syntax and structure of a BIMI record are crucial for proper implementation. A BIMI record is published as a DNS TXT record at default._bimi.yourdomain.com and consists of just a few tags:
- v: the version, which is always
BIMI1and must appear first. - l: the HTTPS location of your logo file (the Brand Indicator Image, or BII), which must be an SVG Tiny PS file.
- a: the Authority Evidence Location: the HTTPS URL of your certificate (VMC or CMC) as a PEM file. The BIMI specification permits this tag to be empty or omitted, but self-asserted BIMI has limited mailbox-provider support.
l points to the logo, and a points to the certificate. There is no s (selector) tag inside the record. The selector lives in the DNS query name (selector._bimi.yourdomain.com), not in the value. Follow this structure exactly so mailbox providers can fetch and validate each piece.
Including the certificate (VMC or CMC)
A certificate lets a Mark Verifying Authority validate the organization's right to use the logo. There are two common options:
- Verified Mark Certificate (VMC): commonly uses a registered trademark or another mark type accepted by the issuing authority. Provider-specific verified indicators can require a VMC.
- Common Mark Certificate (CMC): supports qualifying marks that do not use the VMC trademark path. Issuers and mailbox providers apply their own evidence and display rules.
a tag. The BIMI Group implementation guide describes VMC or CMC acquisition as highly recommended but optional at the record level, while warning that self-asserted BIMI has limited provider support. Check the target mailbox provider's current policy before purchasing.
Adding the logo
To create an effective logo, consider the following:
- Design: Create a recognizable image that represents your brand identity, centered on a solid background. BIMI logos must be square (a 1:1 aspect ratio), so design for that shape from the start.
- Format: Save the logo as SVG Tiny PS (SVG Portable/Secure), a restricted SVG profile, not a general SVG export. Ordinary SVGs from a design tool will fail validation until they are converted.
- Size: Keep the file at or under 32 KB, and strip any scripts, external references, or animation the SVG Tiny PS profile forbids.
l tag in your BIMI record. Palisade's BIMI SVG converter turns a standard SVG into a compliant SVG Tiny PS file.
Publishing and Testing the BIMI Record
After creating the BIMI record, it's time to publish it and test its configuration. Let's go through the necessary steps:
Publishing the BIMI Record in the DNS
- Access your DNS provider's control panel.
- Locate the DNS management section for your domain.
- Add the TXT entry with your BIMI record, following the proper syntax and structure.
- Save the changes and allow some time for the DNS changes to propagate.
v=BIMI1; l=https://example.com/bimi-logo.svg; a=https://example.com/vmc.pem
Let's break down the components of this example BIMI record:
- v: The BIMI version. It is always
BIMI1. - l: The HTTPS URL where your logo is hosted, as an SVG Tiny PS file, here,
https://example.com/bimi-logo.svg. - a: The Authority Evidence Location: the HTTPS URL of your VMC or CMC certificate as a PEM file, here
https://example.com/vmc.pem. Leave this off only if you are testing without certificate-backed display.
a as a hash algorithm (like sha256) or to add an s=selector tag. Neither is correct: a is the certificate URL, and the selector belongs in the DNS name (default._bimi.yourdomain.com), not in the record. Remember that this is just an example, and the exact URLs will point to your own logo and certificate.
Verifying BIMI Record Configuration
Once the BIMI record is published, run the BIMI checker and confirm the v, l, and a values resolve as intended. Fetch the logo and certificate URLs in a private browser window to catch authentication, redirect, TLS, or content-type problems.
Testing BIMI Display in Email Clients
Send through a production stream that passes SPF, DKIM, and DMARC, then test the mailbox providers that matter to the organization. Record validation and provider display are separate checks: a valid DNS record can still remain undisplayed because of reputation, certificate, caching, or provider-specific criteria.
Troubleshooting and Common Issues
During the BIMI implementation process, you may encounter certain issues or errors. Let's explore some common ones:
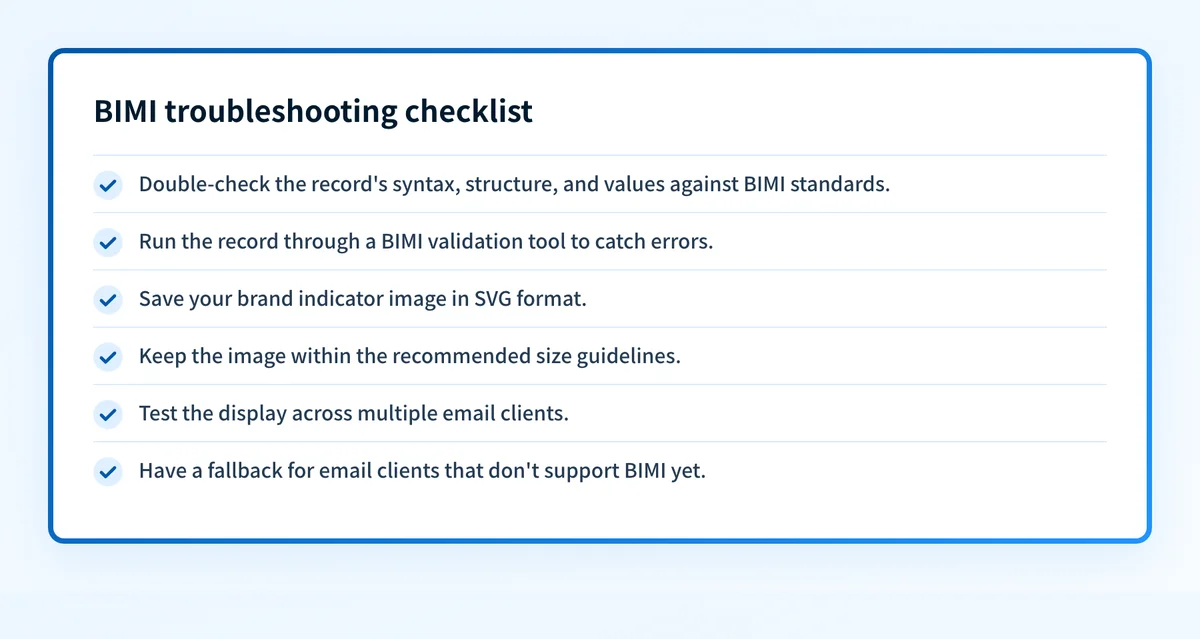 Common BIMI issues and the checks that resolve them.
BIMI Record Validation Errors
BIMI record validation errors can occur if there are syntax or structural issues in your BIMI record. Double-check the syntax, structure, and values within the record to ensure it conforms to the BIMI standards. Consider using validation tools or consulting with experts to identify and resolve any validation errors.
Image Size and Format Issues
Incorrect image size or format can lead to display issues with your BII. Make sure to adhere to the recommended image size guidelines and save your BII in SVG format for optimal display across different devices and email clients.
Email Client Compatibility Challenges
Not every mailbox provider supports BIMI, and participating providers apply different display criteria. Use the BIMI Group's current provider information rather than relying on a static compatibility list, then test real messages at the providers your recipients use.
Best Practices for BIMI Implementation
To make the most out of your BIMI implementation, consider these best practices:
Regularly Monitor BIMI Compliance
Stay updated with BIMI standards and guidelines to ensure ongoing compliance. Regularly monitor your BIMI implementation and make any necessary adjustments to maintain a seamless brand experience for your recipients.
Optimize Brand Indicator Image (BII)
Continuously optimize your BII to enhance its visual impact and brand recognition. Keep your brand guidelines in mind while making any design updates and ensure that the BII remains consistent with your brand identity.
Stay Updated with BIMI Standards and Guidelines
As BIMI is still evolving, it's important to stay informed about any updates or changes in the BIMI standards and guidelines. Regularly check for updates from the BIMI Working Group and other reputable sources to ensure you are implementing the latest best practices.
Evidence
Sources and further reading
- BIMI Group implementation guide: the record syntax, certificate options, and logo requirements.
- BIMI Group provider information: which mailbox providers display BIMI and the conditions they apply.
- draft-brand-indicators-for-message-identification: the BIMI Internet-Draft that defines the
v,l, andatags. - Google Workspace Admin Help: Set up BIMI: Google's requirements for showing a BIMI logo in Gmail.
Conclusion
A sound BIMI rollout is evidence-driven: authenticate every real sender, enforce DMARC, validate the SVG and certificate path, publish the record, and test the providers that matter. Start with the BIMI checker for the public record and use a real message header to confirm the production stream passes and aligns.
Questions readers ask
Frequently asked questions
Do I need a VMC, or will a CMC do?
It depends on the mark, issuing authority, and mailbox provider whose display you want. A VMC follows the verified-mark path; a CMC provides another certificate-backed route for qualifying marks. Confirm current eligibility and display treatment with both the issuer and target provider before buying.
Can I set up BIMI without a certificate?
The a tag is optional at the record level, so a self-asserted record can validate. In practice, provider support for self-asserted BIMI is limited. A VMC or CMC expands certificate-backed eligibility but still does not guarantee display.
Why isn't my logo showing even though the record validates?
Check DMARC enforcement and coverage, real-message authentication, SVG Tiny PS compliance, public HTTPS access, certificate validity when used, and the recipient provider's display criteria. A BIMI record lookup confirms public DNS but cannot guarantee provider display.
How long does BIMI take to appear after publishing?
Once DNS propagates (minutes to a few hours) and the certificate validates, logos typically begin showing within a day, though some providers cache aggressively and take longer.

Written by
Johanie DupontBrand & Ecommerce Email
Johanie Dupont works on brand and ecommerce email at Palisade: BIMI and verified marks, sender requirements, and getting marketing mail into the inbox.
More from Johanie →