How To Get a Verified Mark Certificate (VMC)

What is a Verified Mark Certificate (VMC) ?
A Verified Mark Certificate is a digital document that authenticates the legitimacy of a brand’s logo. A Certificate Authority (CA) issues this certificate, certifying that the logo linked with a specific domain is indeed genuine and owned by the party controlling that domain.
Why Getting your Verified Mark Certificate (VMC) ?
1- Obtain your Gmail Verified Checkmark:
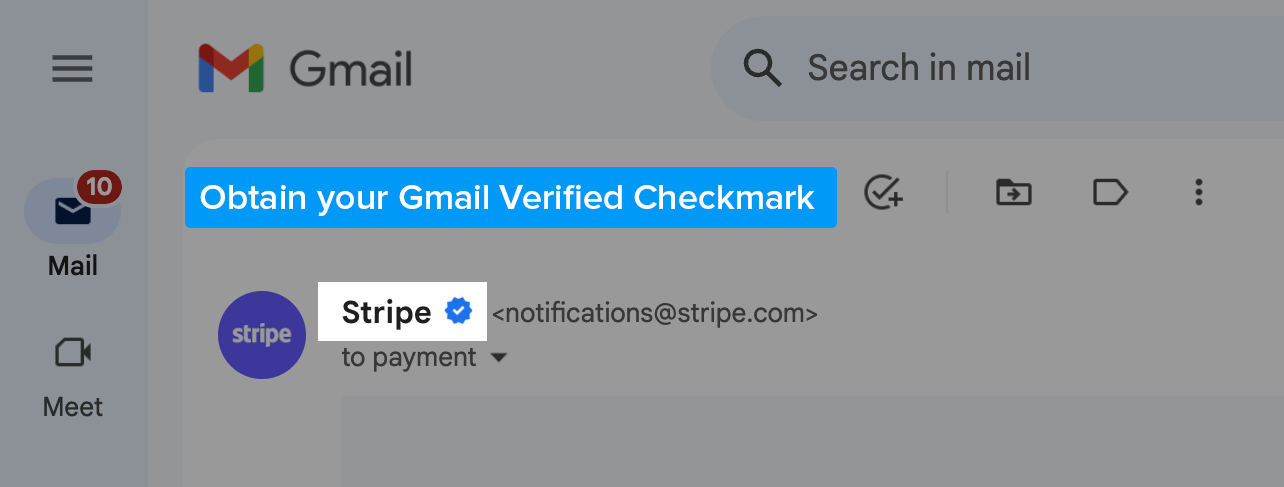
2- Be able to display your brand's logo in the Gmail Profile Picture:
![]()
It is Step 3 of Getting your Blue Gmail Checkmark.
Importance of VMCs for Brand Recognition and Email Engagement
Obtaining a VMC can play a pivotal role in enhancing your brand recognition and improving your email engagement rates. First and foremost, a VMC adds to your brand's credibility. Seeing your verified logo in their inbox assures customers that they are interacting with an authentic communication from your brand.
Additionally, a VMC provides an extra level of security for your brand. With phishing attacks on the rise, consumers have become more vigilant about engaging with emails. A verified logo sends a strong signal of trust to your customers, reducing the chance of them dismissing your emails as potential scams.
Finally, a VMC can significantly boost your email open rates. When recipients recognize a trusted logo in their inbox, they are more likely to open the email, thus improving engagement.
Expansion of VMC Support by Major Email Providers
Major email service providers are gradually expanding their support for VMCs. Tech giants like Gmail, Yahoo, and Outlook are increasingly recognizing the value VMCs bring in promoting trust in email communication.
The broadening acceptance of VMCs gives brands a golden opportunity to enhance their credibility. As a tech brand, acquiring a VMC should be a priority in your digital strategy.
In the upcoming sections, we will explore how you can obtain a VMC for your brand. Stick around as we walk you through each step of this process, ensuring that your journey towards achieving a higher level of brand credibility is smooth and straightforward.
Step 1 – Be DMARC Compliant
Getting a Verified Mark Certificate starts with becoming DMARC compliant. DMARC, or Domain-based Message Authentication, Reporting & Conformance, is a critical element of email security and validation.
Explanation of DMARC (Domain-based Message Authentication, Reporting & Conformance)
#
DMARC is a free and open protocol that protects email senders and recipients from spam, spoofing, and phishing. It allows the owner of a domain to specify the email handling policy, i.e., how the email receiver should handle emails that were not authenticated against SPF (Sender Policy Framework) and DKIM (DomainKeys Identified Mail).
#
Benefits of DMARC for Email Security and Validation
#
DMARC fortifies your email security by ensuring only authorized senders can use your domain, preventing spam and phishing attacks. In terms of validation, DMARC proves to email providers that your emails are genuine, hence increasing their deliverability.
#
Checking DMARC Compliance Using Tools Like MxTool
box
#
To check your domain’s DMARC compliance, you can use online tools such as MxToolbox. By simply entering your domain, the tool can analyze if your domain is DMARC compliant.
#
Setting Up DMARC for Your Domain
#
To become DMARC compliant, you'll need to configure SPF and DKIM, and then set up DMARC for your domain.
#
Configuring Sender Policy Framework (SPF)
#
SPF is an email authentication method that specifies which mail servers are authorized to send email for your domain. To configure it, you need to list the IP addresses authorized to send email on your behalf.
#
Collecting IP Addresses Used to Send Email
#
Start by collecting the IP addresses of all the systems that send email on your domain's behalf. This could include your corporate mail server, marketing automation platform, CRM system, and any other system that sends email using your domain.
#
Creating SPF Records
#
Once you have the list of IP addresses, create an SPF record in your DNS. An SPF record is a TXT record that lists the servers authorized to send email on behalf of your domain.
#
Checking SPF Records Using Tools
#
After you've created your SPF record, it's a good idea to check it with an SPF record checker, like the one offered by MxToolbox. It can verify if your SPF record is set up correctly.
#
Setting Up DomainKeys Identified Mail (DKIM)
#
DKIM is another email authentication method. It allows receiving email servers to check if email claiming to come from a specific domain was authorized by the domain's owner.
#
Choosing a DKIM Selector and Generating Key Pair
#
The first step in setting up DKIM is to choose a selector, which is essentially a tag used to identify the DKIM signing entity. Then, generate a public-private key pair.
#
Creating TXT Records with Public Key
#
Publish the public key in your DNS as a TXT record. This allows the receiving mail server to find and retrieve your public key to verify your emails.
#
Configuring DMARC Monitoring Mode
#
When you first set up DMARC, you'll want to put it in "monitoring mode". This allows you to see what would happen if you applied a policy without actually affecting your email flow.
#
Choosing Appropriate DMARC Settings
#
Once you're comfortable with the results, you can choose a DMARC policy to apply to your email. This tells email receivers what to do if a message fails DMARC authentication—whether to reject it, quarantine it, or allow it.
#
Becoming DMARC compliant is the first essential step to getting a Verified Mark Certificate, setting the groundwork for your email security and boosting your brand's credibility.
#
Step 2 – Use a Trademarked Logo
#
The second step in the process of obtaining a Verified Mark Certificate is using a trademarked logo. This involves securing a trademark for your logo if you don't have one already.
#
Requirement of a Trademarked Logo for VMCs
#
A trademarked logo is a fundamental requirement for obtaining a VMC. The Certificate Authorities (CAs) that issue VMCs need to validate that your organization owns the logo associated with your domain. This ownership is established through a registered trademark.
#
Checking Trademark Registration Using WIPO's Website
#
If you're unsure about your logo's trademark status, you can use the World Intellectual Property Organization's (WIPO) database to check if your logo is already trademarked. Simply navigate to the WIPO's website and follow the instructions to conduct a search.
#
Approved Trademark Offices for VMCs
#
To be eligible for a VMC, your logo must be registered with one of the approved trademark offices. These include the United States Patent and Trademark Office (USPTO), the European Union Intellectual Property Office (EUIPO), and the United Kingdom Intellectual Property Office (UKIPO), among others.
#
Initiating the Trademark Process and Filing Application
#
If your logo isn't trademarked, you will need to initiate the trademark process. This generally involves filing an application with the relevant trademark office. The application should include a representation of your logo, along with a list of goods or services that your logo represents.
#
Guidelines for Identifying Goods and Services, Conducting Searches, and Gathering Application Information
#
When identifying goods and services for your trademark application, be specific but also broad enough to cover any future expansion of your business. Prior to filing, conduct a thorough search to ensure no similar trademarks exist that could conflict with yours. When gathering information for your application, be sure to include the precise legal name of the owner, a depiction of the mark, and the goods and services associated with the mark.
#
Remember, having a trademarked logo is critical not just for obtaining a VMC, but also for safeguarding your brand's identity in the digital landscape. So, make sure you give this process the attention it deserves. After all, this is about securing your brand's digital identity.
#
Step 3 – Format Your Logo
#
After establishing DMARC compliance and trademarking your logo, the next step in obtaining a Verified Mark Certificate is to properly format your logo.
#
Logo Format Requirements: Scalable Vector Graphics (.SVG) in SVG Portable/Secure (SVG-P/S) Profile
#
For a logo to be eligible for a VMC, it must be formatted as a Scalable Vector Graphic (SVG) in the SVG Portable/Secure (SVG-P/S) profile. SVG is a vector-based format which allows your logo to scale to different sizes without losing quality. The SVG-P/S profile adds an extra layer of security by removing any scripts or links that could potentially be harmful.
#
Converting Logo to Vector Format and Exporting as SVG Tiny 1.2
#
To begin, you'll need to convert your logo to a vector format. This can be done with various graphic design software like Adobe Illustrator. Once your logo is in vector format, it can be exported as an SVG Tiny 1.2, which is a subset of SVG specifically designed for small file sizes and compatibility with all platforms.
#
Editing SVG File Using a Text Editor and Adding Necessary Elements
After exporting your logo as an SVG, you may need to use a text editor to adjust the code and add any necessary elements to comply with the SVG-P/S profile. This might involve removing unnecessary metadata or scripts, or specifying colors in a format accepted by email clients.
Adhering to Guidelines for Optimal Logo Display
###
For optimal display of your logo, adhere to the following guidelines: maintain a square aspect ratio; avoid including text, as it might not be legible at smaller sizes; and stick to simple designs, as complex patterns or gradients may not display well across all platforms.
###
Properly formatting your logo is crucial to ensure it is displayed correctly and consistently across different platforms. By adhering to these guidelines, you'll be one step closer to obtaining your Verified Mark Certificate and boosting your brand's digital presence.
###
Step 4 – Purchase Your VMC
###
Once you've become DMARC compliant, trademarked your logo, and formatted it properly, you're ready for the next step - purchasing your Verified Mark Certificate.
###
Introduction to Purchasing VMCs from Trusted Vendors
###
Verified Mark Certificates are available from a number of trusted vendors. These vendors, or Certificate Authorities (CAs), have been authorized to issue VMCs. Choose a vendor that not only provides the required VMCs but also aligns with your company's needs in terms of cost, customer service, and reliability.
###
Single VMC vs. Multi-SAN VMCs
###
When purchasing a VMC, you have the choice between a Single VMC or a Multi-SAN VMC. A Single VMC is associated with a single logo and a single domain, whereas a Multi-SAN (Subject Alternative Name) VMC allows you to associate your logo with multiple domains. Your choice will depend on the specific needs of your organization.
###
Validation Process for VMC Issuance, Including Trademark Confirmation and Identity Verification
###
After you've selected your preferred type of VMC, you'll need to undergo a validation process before the VMC is issued. This process includes confirming your trademark and verifying your organization's identity. The CA will check that your logo is trademarked with an approved trademark office, and verify your organization's legal status and domain ownership.
###
This process ensures that only authorized organizations receive VMCs, and the verification gives confidence to email recipients that your emails are indeed from your organization.
###
Taking this step to purchase your VMC is an investment in your organization's reputation and email security. It adds a level of trust that goes a long way in the world of email communication.
###
Step 5 – Upload the VMC to Your Web Server
###
The penultimate step on your journey to securing a Verified Mark Certificate is uploading the VMC to your web server. Let's delve into this process.
###
Receiving the Entity Certificate PEM File
###
After you've successfully passed the validation process with your Certificate Authority (CA), you'll receive your VMC in the form of an entity certificate PEM file. This file will contain your verified logo and will need to be uploaded to your web server.
###
Appending Intermediate Certificates, If Applicable
###
In some instances, your CA might also provide you with one or more intermediate certificates. These serve as a link of trust between your certificate and a root certificate that browsers inherently trust. If you receive these, you'll need to append them to your entity certificate file to form a complete certificate chain.
###
Uploading the PEM File to the Web Server
###
Once you have your entity certificate (and intermediate certificates, if applicable) in order, you'll upload the PEM file to your web server. The specific method for doing this can vary depending on your server's setup, but generally involves accessing your server's certificate management interface and uploading the PEM file.
###
Step 6 – Add a BIMI TXT Record to Your Domain
###
Finally, the last leg of your journey to a Verified Mark Certificate is adding a Brand Indicators for Message Identification (BIMI) TXT record to your domain. Let's dive into this.
###
Creating the BIMI TXT Record with PEM File and Logo File Locations
###
Firstly, you'll need to create a BIMI TXT record. This record will point to the location of your PEM file and logo file. Generally, a BIMI TXT record will look something like this: "v=BIMI1; l=https://yourdomain.com/logo.svg; a=https://yourdomain.com/VMC.pem;"
###
Adding the BIMI Record as a DNS TXT Record with the Domain Provider
###
Once the BIMI TXT record is created, the next step is to add it to your DNS records. This can typically be done through your domain provider's dashboard. You'll add a new TXT record for the hostname "_bimi" and then paste in the BIMI record you've created.
###
Allowing Time for Logo Display Activation and Checking BIMI Record
###
Once you've added the BIMI record to your DNS, you'll need to allow some time for the changes to propagate and for the logo to become active in your emails. This can take anywhere from a few hours to a few days. During this time, you can use a BIMI Lookup tool to check the status of your BIMI record and ensure everything is set up correctly.
###
Confirming Proper Logo Display by Sending a Test Email
###
After your BIMI record is confirmed, it's a good idea to send a test email to ensure your logo is being displayed correctly. Remember, the appearance may vary between different email clients.
###
That's it! You've successfully navigated the process of obtaining a Verified Mark Certificate and setting up BIMI for your domain. By doing so, you've added a significant layer of authenticity to your brand's email communications, providing reassurance to your recipients that your emails are genuine. Congratulations on this noteworthy achievement!
###
Recap of the Steps to Acquire and Implement a VMC
###
Acquiring a Verified Mark Certificate (VMC) is an orchestrated series of methodical steps, each playing a critical role in the larger scheme of things. To summarize:
###
###
Emphasizing the Benefits of VMCs for Email Marketing and Security
The journey to acquire a Verified Mark Certificate may seem involved, but its benefits are multifaceted and worth every effort. With a VMC, you add an additional level of authenticity to your brand's email communications, bolstering trust and recognition. Your logo next to your emails acts as a powerful visual confirmation of your brand's identity, mitigating the risk of phishing attempts and improving email deliverability.The value of this additional security and assurance cannot be understated. It's an investment in your brand's reputation and credibility, which ultimately translates into greater success. As we've emphasized throughout, in today's digital communication landscape, trust is paramount.
##
So, is this journey to obtaining a Verified Mark Certificate worth it? Absolutely. By ensuring your email communications are secure, recognizable, and authentic, you're fostering trust with your audience – a trust that is likely to pay dividends in the long run.
##
How GetVerified.Email Can Help
##
Deciphering all this technical jargon can feel like learning a new language, can't it? We at GetVerified.Email understand that. We know that these steps to acquire a Verified Mark Certificate (VMC), while crucial, can seem overwhelming. That's precisely why we're here to help.
##
We specialize in helping businesses like yours navigate this complex terrain. Whether you're just beginning your journey towards acquiring a VMC or you're midway and unsure about the next steps, we're here to offer our expertise and guidance.
##
Our team at GetVerified.Email can help you assess where you currently stand in this process. We'll break down the technicalities, streamline the information, and provide a clear roadmap tailored to your specific needs.
##
And how do we start? It's simple. By getting to know a little bit about you and your business.
##
We've prepared a straightforward 2-minute questionnaire that helps us understand your current position and the challenges you may be facing. Once we have that information, we can provide you with a personalized plan of action.
##
So, are you ready to take the next step in enhancing your brand's email security and visibility? We invite you to fill out our questionnaire here.
##
By doing so, you're not only investing in your brand's digital integrity but also ensuring a seamless, secure, and trusted email communication channel for your audience. With GetVerified.Email, you're never alone in your journey towards a Verified Mark Certificate. Let's take this step together.
##